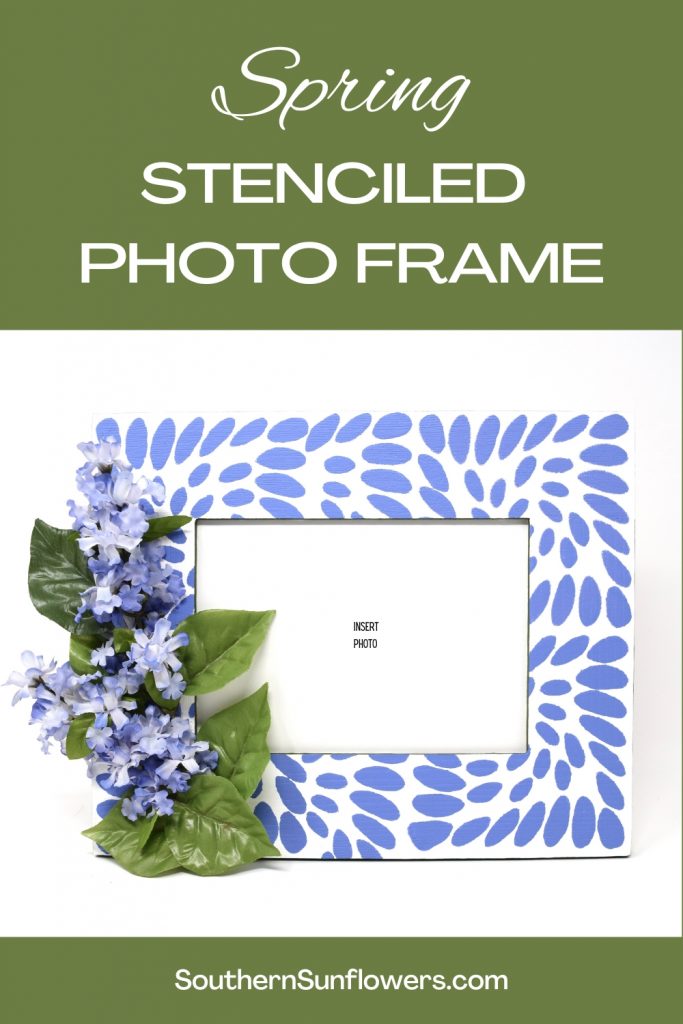
I’ve got a wonderful spring home decor idea for you this week! This DIY photo frame using a craft stencil is a simple way to decorate an unfinished wooden frame.
Plan ahead for Mother’s Day and give your decorated frame as a gift with a favorite family picture inserted, or you can use it to display an Easter photo of your kids.
DIY PHOTO FRAME USING A CRAFT STENCIL

As an Amazon associate, I earn on qualifying purchases at no additional costs to you.
SUPPLIES NEEDED:
- 8×10 unfinished wood frame (Walmart)
- glue gun
- white craft paint
- paint to match your flowers
- foam stencil pouncer
- artist brush or foam paint brush
- liner artist brush
- medium head artist brush
- faux flowers
- craft stencil (Dollar Tree)


HOW TO DECORATE A PICTURE FRAME
STEP 1 – PAINT AND STENCIL THE FRAME
Sand the wood frame if needed and wipe off dust.
Paint the entire unfinished wood frame using white craft acrylic or chalk paint with two coats. You can use an artist brush or foam paint brush.
Use a hair dryer to speed up the drying time in between coats.

BEGIN STENCILING:
I ended up using a foam pouncer to stencil because the one in my “supplies needed” picture didn’t work well.
Since I was only using a small corner from the main craft stencil, I held it in place instead of taping.
Use a hair dryer to speed up drying time before moving to the next section to stencil.
Load the foam pouncer with paint and then off load onto a paper towel.
You off load by tapping the pouncer up and down so there’s not a lot of paint once you begin stenciling on the photo frame.
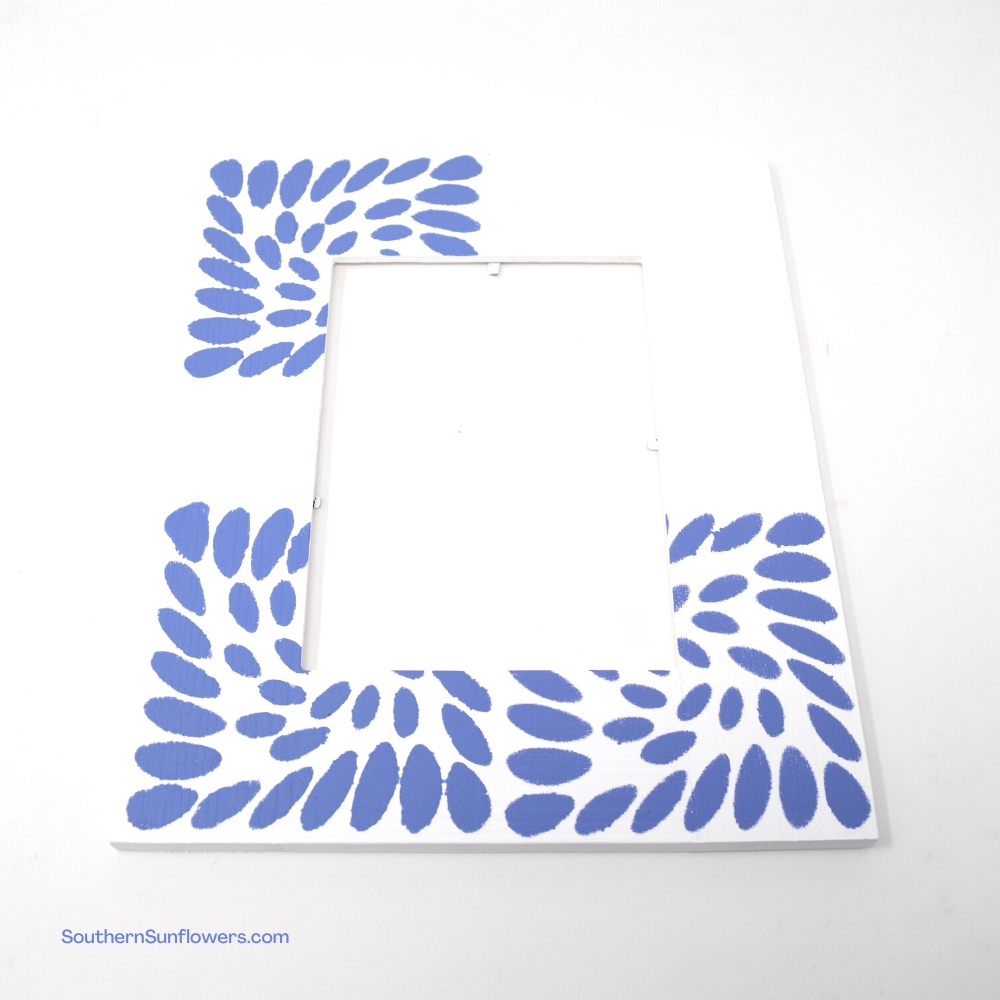

Pounce up and down on top of the stencil, holding the stencil down, as you move around.
Go light on the paint and keep moving around so the paint won’t bleed under the craft stencil.
I got overzealous in some areas with too much paint because I’m impatient, so I had to touch up many areas using a liner artist brush.
STEP 2 – ADD AN ACCENT COLOR TO THE FRAME
I used a medium head artist brush to paint the inset and outside edge as seen below. I chose to feature the green from the leaves.

STEP 3 – ATTACH THE FLOWERS AND LEAVES
I pinched off some flowers from a floral bush I had in my stash along with some extra leaves. Use hot glue to attach your flowers to the frame and add an extra leaf where needed.

I hope you enjoy decorating your photo frame using a craft stencil. You can customize your colors to match your spring home decor!

YOU MAY ALSO BE INTERESTED IN SEEING:
UPCYLED DENIM BLUE FLOWER IN A FRAME
HOW TO PAINT A PICTURE FRAME MAT
19 IMPRESSIVE SPRING CRAFT IDEAS FOR ADULTS
I’ve joined a group of creative bloggers this month for a “Craft De-Stash” challenge. We each dove into our overflowing craft supplies to create an exciting craft or home decor project for you to get inspiration. I have lots and lots of unfinished wood, so I chose to decorate a picture frame. Be sure to see to visit all the links. Don’t miss out!
NOW, SEE WHAT MY BLOGGING FRIENDS MADE USING THEIR CRAFT STASH!

Niki / Life as a LEO Wife ~ St. Patrick’s Day Sign
Gail / Purples Hues and Me ~ DIY Wood Trim Trifle Bowl
T’onna / Sew Crafty Crochet ~ Potted Cactus Scarf
Marci / Stone Cottage Adventures ~ Vibrant Tote with Pockets
Sharing my photo frame at these fabulous blogs!

ABOUT THE AUTHOR
AllysonAllyson is the founder and content creator of Southern Sunflowers. She shares tutorials for DIY crafts and decor on a budget.
This is a great tutorial, I especially like the idea of adding faux flowers for an extra touch. This is a relatively easy project that can be completed in a few hours, and it’s a great way to personalize your home décor.
Bob, I’m glad you like my photo frame. Thanks for visiting!
Allyson,
What a lovely frame you created. Congratulations, you are being featured on Thursday Favorite Things. I hope you stop by. https://www.eclecticredbarn.com/2023/03/celebrating-on-thursday-favorite-things.html
Hugs,
Bev
Beverly, thank you so much for featuring my photo frame. Much appreciated!
Frames are so expensive especially when you are seeking a custom look, love this idea. Affordable, and doable. I love that in a project. Thank you for sharing with Whimsy Home Wednesday!
Cara, I’m glad you like my frame idea and thanks for letting me share at your party!
How pretty — love the color choice and the added flowers. Thanks for sharing at Vintage Charm. xo Kathleen
Kathleen, thanks for the compliments! 🙂
That is beautiful!!
Thank you, Joanne! I thought the periwinkle color was pretty for a spring frame.
Love your frame and the colour you chose.
Thanks, Claire! I thought the color looked fresh for spring.
Well this is the cutest frame! Perfect way to add some Spring touches around the house. Thanks for sharing on the Home Imagined link party. Have a great week-Meagan
Meagan, so glad you like my spring photo frame!
Such a cute frame! I love the color of the flowers and paint you used!
Thank you, T’onna! My last craft had those colors, also. I must be feeling a little lavender blue ~ lol.
What a transformation! I love the colors you chose for your frame, perfect for Spring! -Marci @ Stone Cottage Adventures
Thank you, Marci! Spring can’t get her fast enough for me.
So cute! Love the lavender on the frame. Pinned!
Niki, thanks for the compliments and for pinning!
What a fun DIY de-stash project to show off your photos and to enhance your decor! Love the stencil and color you chose to make this! It is quite pretty!
Thank you, Gail! I like that Dollar Tree carries a few stencils. They’re not the best quality, but then again, I’m not the best stenciler ~ lol.