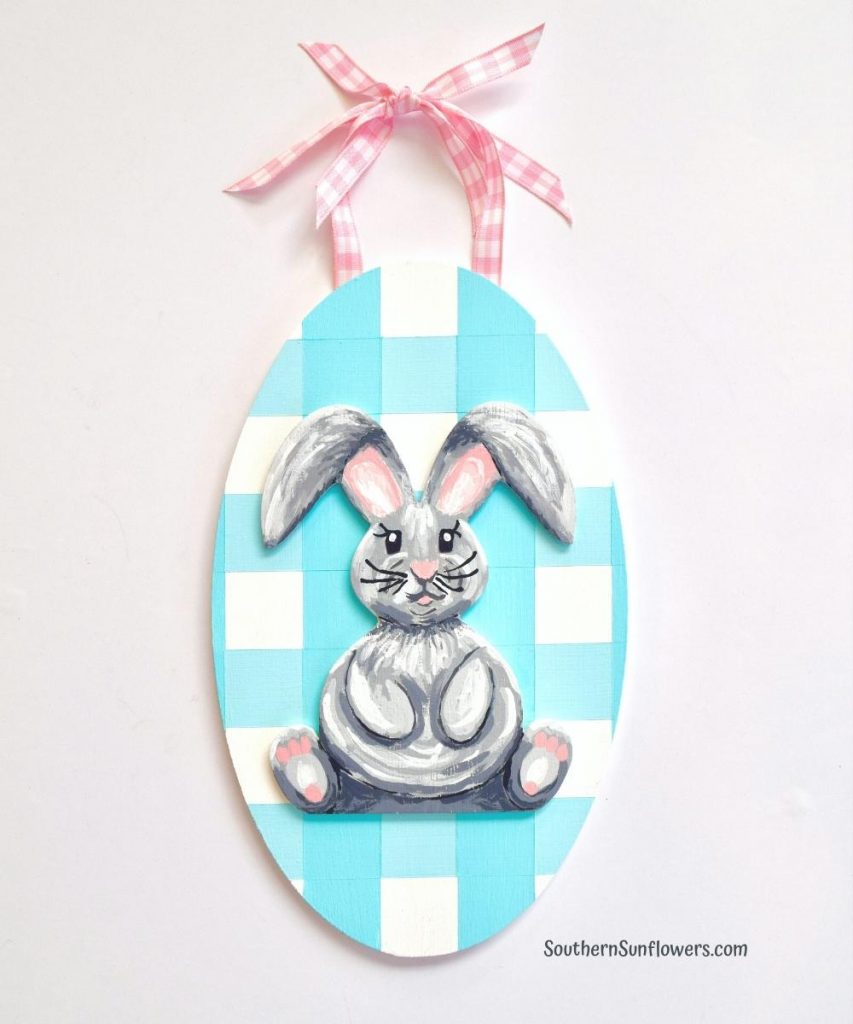
How adorable will this painted bunny on wood be for Easter decor this year? Very adorable, that’s right! You can paint this cute bunny sign to refresh your existing Easter decorations and get yourself in a hip hop, happy mood!
Even though I’m using this wooden bunny sign as Easter decorations, I think this craft idea would also look so cute hanging in a nursery or child’s room throughout the year.
As an Amazon associate, I may earn on qualifying purchases at no additional cost to you.
PAINTED BUNNY ON WOOD FOR EASTER
SUPPLIES NEEDED:
- oval unfinished wood shape
- bunny unfinished wood cutout
- craft paints ~ white, grey, pink, black
- painter’s tape
- small foam paint brush
- artist paint brushes
- ruler
- pencil

HOW TO PAINT A DESIGN ON THE BUNNY SIGN
STEP 1 – PAINT A BASE COAT ON THE OVAL SHAPE
Use the foam sponge brush to paint white on each side of the oval and the outer edges. You will need 2 to 3 coats.
STEP 2 – PAINT A BUFFALO PLAID DESIGN
I wanted to add some colorful pizazz to my grey bunny, so I thought a nice background contrast would be a light turquoise buffalo plaid. I really like how it turned out!
You’ll be using the painter’s tape to make your plaid design. Follow the illustrated tutorial for painting buffalo plaid which can be found in my wooden cutting board makeover post.

HOW TO PAINT A BUNNY ON WOOD
I used this painted bunny from Pinterest to gain some painting inspiration to create my own look.
I have provided some photos of my painted wood bunny showing how it progressed along the way so you’re able get an idea of the major steps.
STEP 3 – PAINT AND SKETCH THE BUNNY
PHOTO ONE – Start by painting the side edges and the top side of your bunny with white paint. Two coats will be needed. Let dry completely.
Use a pencil to sketch the features of a bunny on your wood cutout.

Squirt out blobs of each paint color so you’ll be able to mix them together to create your layering, highlighting and shading in the next steps.
Below is how my mixing sheet looks as I’m using it.

PHOTO TWO – I started painting the ears with a base coat of grey and pink.
Begin mixing your paints, like white mixed into the grey to make a lighter grey, and likewise for the pink.
Start layering and blending your paint where you want the highlights to be. There are no “mistakes” because you can just keep painting over and blending until you like what you see.
TIP – Do not wait for the paint to dry. Keep layering while the paint is wet.

PHOTO THREE – Paint over your sketch marks with black paint. Don’t worry about the bold look as you’ll be layering paint over most if it.
I mixed the black and grey together to get a dark grey shade for shading the ears. Remember, there are no “mistakes,” just keep mixing and painting until you like what you see.
Paint the remaining pink areas – nose, mouth, and feet.

Fill in the rest of the bunny body with a base coat of grey paint.
Mix grey and white paints to make a lighter shade of grey and highlight areas over the base grey color.
Use some of this grey color to paint slightly over the bold black areas you had painted.
Paint white highlights over the light grey areas.
Mix black and white to make a dark grey and use it to shade in areas like you see below.
Continue mixing and blending all areas until you get your desired look.
Add black whiskers and eyelashes. Then add white to the eyes. Below is a closeup of the finished bunny.

STEP 4 – ATTACH THE BUNNY AND ADD A BOW
I used E-6000 glue to attach the bunny to the oval shape. Hot glue may work just as well, but I wanted a more secure hold.
Use glue to attach a gingham ribbon to the back for a hanger.
Tie 2 additional pieces of ribbon to the top of the ribbon hanger as seen below.
TIP: Move the end of each ribbon end over a lighter to seal the ends and prevent the ribbon from fraying.

I hope you’ve gotten some inspiration for creating your own Easter decor and learning how to paint a wooden bunny!
YOU MAY ALSO BE INTERESTED IN THESE EASTER IDEAS:
EASTER HOME DECOR AND CRAFT IDEAS
DIY CARROT CRAFT FOR EASTER DECOR


FOLLOW ME ON PINTEREST FOR MORE DIY CRAFTS AND DECOR INSPIRATION!
It’s time for the monthly Sustainable Pinterest Challenge, where my blogger friends and I pick an idea from one of our Pinterest boards and make it into a “use it up,” recycled, upcycled craft or decor. Our April theme is “Welcome Spring.”
For this Pinterest Challenge, I decided to use up some unfinished wood pieces from my overflowing storage tub. I found an oval shape to mimic an egg and I found lots of bunny cutouts to choose from. Be sure to click the links below to see eight more spring ideas!
CLICK THE PICTURE LINKS BELOW TO SEE 8 MORE SPRING CRAFTS!
MEET YOUR BLOGGERS:
Julie | Sum of their Stories
Gail | Purple Hues and Me
Terri | A Good Life
Lydia | Life Beyond the Kitchen
T’onna | Sew Crafty Crochet
Julie | Treasures Made From Yarn
Allyson | Southern Sunflowers
Mel | Decor Craft Design
Niki | Life as a LEO Wife
Linda | Crafts a la Mode
SHARING MY PAINTED BUNNY AT THESE FABULOUS BLOGS!

ABOUT THE AUTHOR
AllysonAllyson is the founder and content creator of Southern Sunflowers. She shares tutorials for DIY crafts and decor on a budget.

Your painted bunny turned out cute!
Thank you, Julie!
Oh my gosh! So adorable! Thank you for the great tutorial. Pinned!
Denise, I’m so happy you like my painted bunny enough to pin. Thanks so much!
This is so cute. You did an amazing job painting that bunny.
Amy, thank you for the compliments! 🙂
Your bunny is the cutest! You work is great!
Thank you, Tina! Thanks for visiting, too. 🙂
Too adorable Allyson!
Thank you, Jenna! I was aiming for adorable ~ LOL.
Your bunny is just adorable!!
Thank you, Joanne! Glad you like my bunny craft.
Super cute bunny! Great painting, Allyson! It can stays as a door sign all year long!
Thank you for the compliments, Mel! 🙂
What a fun project! Alas, decorative painting doesn’t seem to be in my wheel house but I definitely appreciate your talent. Have a great week! 🙂
Lydia, I like the kind of painting where nothing has to be perfect. You could do it, too!
Your painted bunny is adorable 🙂
Thank you, Claire! 🙂
I love the painted bunny!! And showing the pallet was brilliiant. It showed how you mixed your colors. Nice work. I pinned to my Crafts Board on Pinterest. Best wishes, Linda @ craftsalamode.com
So happy you like my bunny, Linda! I debated whether to even show the mixing pallet. Glad I did since you mentioned it. Thanks for the pin! 🙂
Very cute, Allyson. Happy Easter!
Thank you, Ann! Happy Easter to you, too. 🙂
The bunny is so adorable!! You did a wonderful job painting the bunny. Pinning to my Easter board!
T’onna, thank you for the compliments! Thanks for the pin, too!!
Your painted Easter bunny and egg looks too cute and adorable, Allyson! You are a very talented artist!
Glad you like my egg and bunny, Gail! Thanks for the artist compliment, too. 🙂
Your bunny is TOO cute! I love how you make it look simple by sharing step by step photos. I think you’re right, add a babies name and this is perfect for nursery decor as well as for Easter and Springtime decorating.
Oh good, Julie, I’m glad you thought the visual step-by-step was enough to get the general idea across. I probably should have done a video, but I’m not brave enough for that yet ~ LOL.