Are you tired of replacing bent shepherd hooks? I’m going to share with you how to install a sturdy bird feeder post since we recently had to install one.
Our shepherd poles were constantly bending from squirrels and raccoons jumping and climbing up the metal pole to get to the bird feeders.
We wanted to install a sturdy wood post instead of wasting more money on replacing the shepherd poles.
As an Amazon associate, I may earn on qualifying purchases at no additional cost to you.
HOW TO INSTALL A STURDY BIRD FEEDER POST
SUPPLIES NEEDED:
- 8-ft 4 x 4 pressured treated post
- post hole digger
- level
- hand shovel
- measuring tape and pencil
- screw driver
- cordless drill
- wheelbarrow
- garden hose for water
- medium size gravel
- fast-setting concrete mix (Quikrete)
- post cap
- 2 garden plant hooks (12 inches)
- 4 wood screws
As an Amazon affiliate I earn from qualifying purchases at no additional costs to you.


DO YOU NEED NEW BIRD FEEDERS?
- view a 14-inch metal bird feeder with 6 ports
- a metal bird feeder with a tray that holds 2.2 lbs of seed.
- or a suet feeder with a weather guard?
4 STEPS – HOW TO INSTALL A STURDY BIRD FEEDER POST
STEP 1 – PREPARE THE HOLE
Dig your hole 2-ft deep using your post hole digger and add about 5 inches of gravel for drainage purposes.
Do you have rocky soil? We have very rocky “soil” so we were able to skip the gravel. It was difficult to dig the hole because of all the rocks. If you have this issue, like we did, you may have to let water soak in the hole overnight so you can finish digging the hole the next day.

STEP 2 – MIX THE CONCRETE
Follow the instructions on the Quikrete bag to mix the concrete. Use the wheelbarrow, water hose, and hand shovel to create a putty type texture. See pictures below.
Don’t have a wheelbarrow? You can make your mix in a utility bucket.

STEP 3 – SHOVEL CONCRETE MIX INTO HOLE
Insert the post on top of the gravel and use the hand trowel to fill the hole with the mixed concrete. Mound and angle the mix away from the post for drainage purposes.
Is your post on a hill? If you are installing your post on a downward incline, like we did, then there is no need to mound the concrete mix.

IMPORTANT – Once the hole is filled, use your level to make sure your post is straight.
Wait the entire concrete curing time that Quikrete stipulates on their bag before attaching your bird feeder hooks.
How long before you can attach your hooks? We erred on the side of caution and attached our hooks the following day.
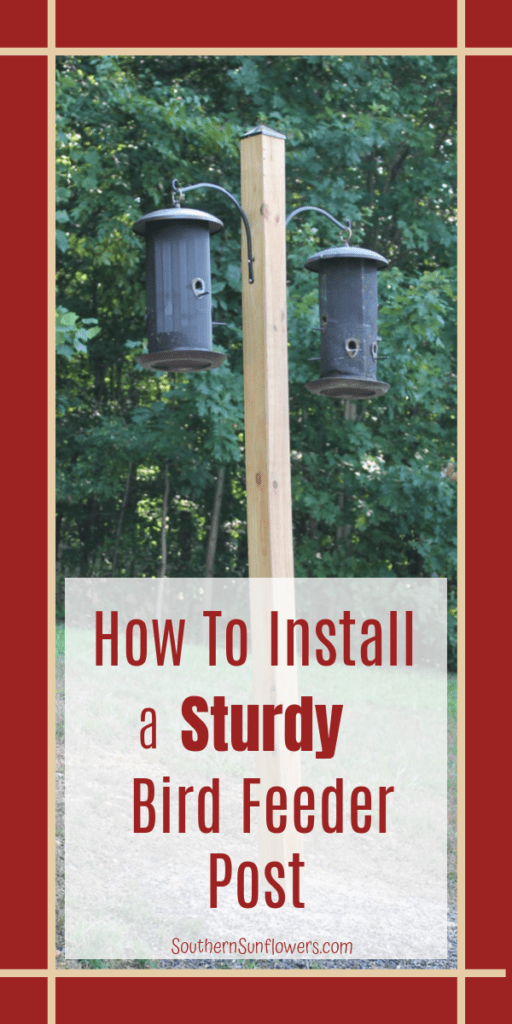
STEP 4 – ATTACH THE HOOKS TO THE POST

We used 12-inch hooks to allow for the width of our bird feeders.
TIP – Test the placement height of your hooks, before attaching them, to make sure you can reach and comfortably hang your bird feeders.
- hold the hook on the pole and at your tested height
- center your hook and draw a pencil mark inside the circles of your hooks
- drill starter holes, hold the hook on the post again, and use the screwdriver to insert the wood screws to attach the hooks
Match your measurements from the first hook and repeat for the opposite side. Once the second hook is attached, its time to hang your bird feeders!
Our new bird feeder post is working out great. This is a project well worth DIYing! Do you have a spot where you need a bird feeder post?
YOU MAY ALSO LIKE TO SEE THESE OUTDOOR PROJECTS:
25 DIY Outdoor Garden Decor Ideas to Inspire You
POLKA DOT BIRDHOUSE & BLUEBIRD TIPS

ABOUT THE AUTHOR
AllysonAllyson is the founder and content creator of Southern Sunflowers. She shares tutorials for DIY crafts and decor on a budget.
Thank you for this post. I’m going
To try it.
You’re welcome, Joleen. My post is still standing strong, and my birds love it. Thanks for dropping by!