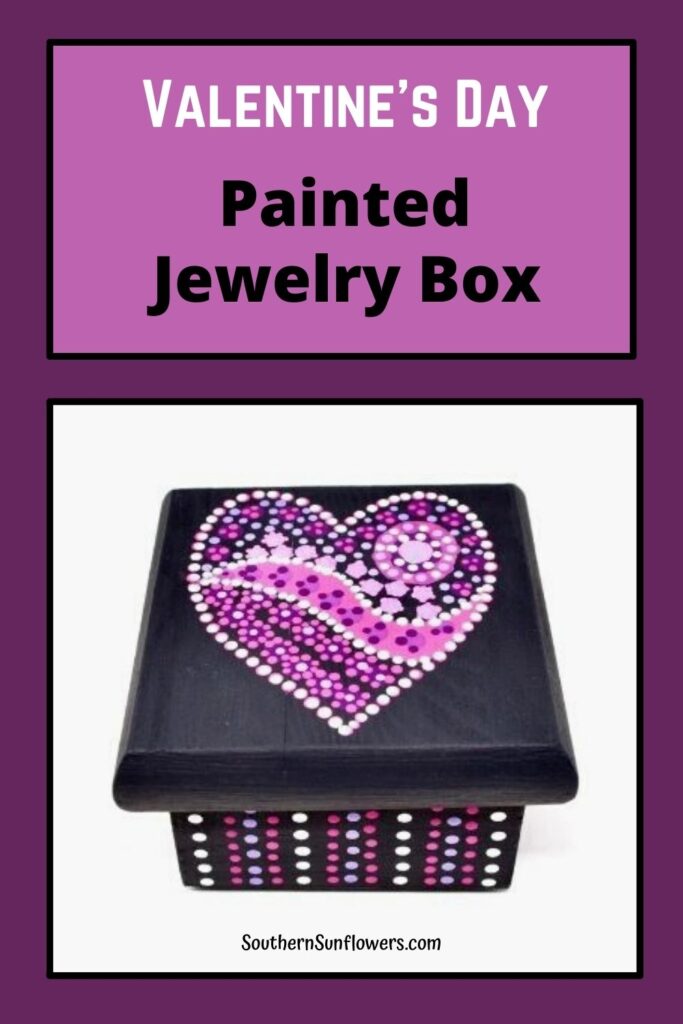
My Valentine’s Day painted jewelry box is so easy and inexpensive to make!
I’ve painted two miniature boxes to give you examples for how you can hand paint those unfinished wooden boxes you see in craft stores.
I grabbed a couple of wood trinket boxes out of my craft stash that I’ve had for a while, but Hobby Lobby has a similar box listed for $2.99. You can also check to see if Michael’s carries any similar ones.

VALENTINE’S DAY PAINTED JEWELRY BOX
SUPPLIES NEEDED:
- mini unfinished wood box
- Apple craft paints
- dotting tool (or household object for making dots)
- medium head artist brush
- Mod Podge
- felt sheet
- pencil
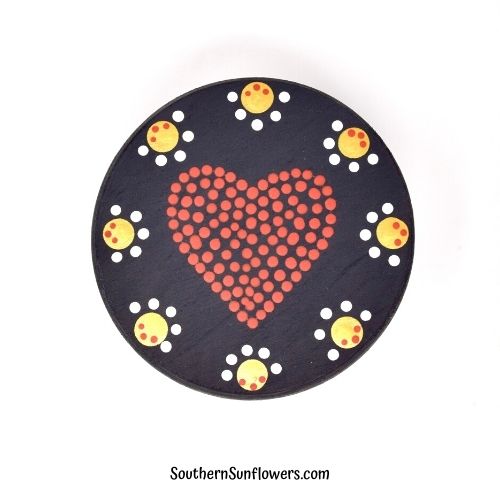
The heart designs I chose to hand paint are called Mandalas which are geometric designs or patterns forming circles.
This art form has been on my “want to try” craft list for a while and, as a beginner, I’ve learned that it’s going to take practice to make my designs look uniform.
These jewelry boxes were lots of fun to paint and I will definitely try more of it in the future.
You can search on Pinterest and Google to get more ideas for how you want your Valentine’s Day painted designs to look using Mandalas.

It’s time for “Under 10 on the 10th” again where I join a group of creative bloggers and we share crafty projects that cost under $10.00 to make. Our theme this month is “Valentine’s Day.” At the end of my post, you’ll find the links to click to view what they have created. Don’t miss out! UPDATE: Supplies may have increased since the published date.
HOW MUCH DOES THIS PAINTED JEWELRY BOX COST TO MAKE?
- UPDATE 2024: prices below have increased
- $8.50 – total
- $2.99 – jewelry box @ Hobby Lobby
- $3.00 – 6 bottles craft paint @ Walmart for .50 each
- $0.50 – felt sheet
- $1.00 – paint brush @ Dollar Tree
- $1.00 – Mod Podge @ Dollar Tree
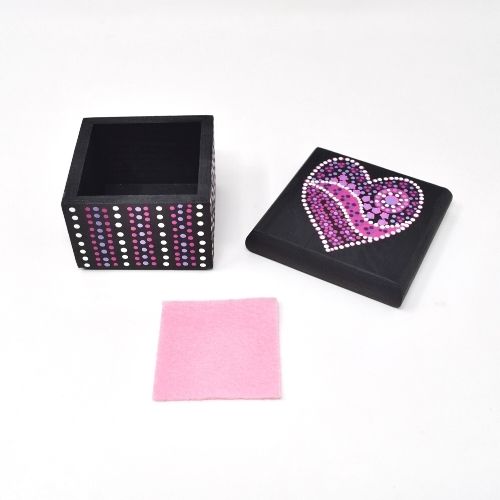
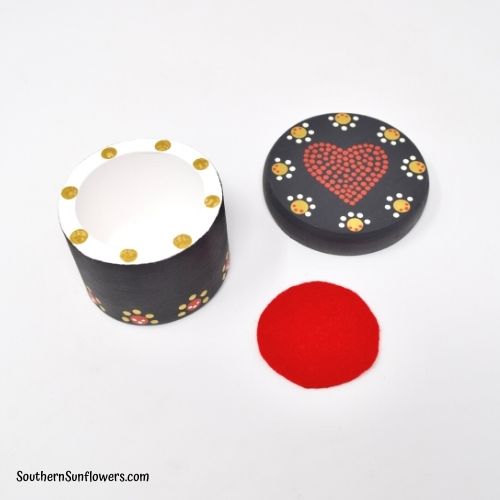
THE SECOND PAINTED JEWELRY BOX IDEA

HOW TO PAINT WOOD JEWELRY BOXES
STEP 1 – MAKE YOUR DESIGN
Doodle your design before you begin painting on your box, so you can determine design placement and get an overall general idea how you would like your design to look.

STEP 2 – PAINT BASE COAT ON JEWELRY BOX
Use a medium head artist brush to paint the base coat on both the inside and out of your jewelry box. The tops and bottoms of the lid and box will need to be painted in steps. Let dry completely in between each step.
STEP 3 – SKETCH HEART ON BOXES
With a pencil, lightly sketch your Valentine heart placement on the lid.
STEP 4 – PAINT / DOT THE DESIGN ON THE BOXES
Find different items from your craft stash or in your office that the ends can be used for dotting. I used different sized paint brush ends, the end of a new pencil eraser, and the head of a ball point straight pin.
STEP 5 – PREPARE THE FELT LINING
Cut a piece of felt to place in the bottom of your jewelry box so it won’t have a rough bottom inside. Plus it makes it look cute inside!
STEP 6 – GLUE THE FELT LINING
Apply Mod Podge with your paint brush to seal your box and design. Let dry and then admire your work!
I hope you enjoy trying your hand at painting Mandalas! Have I given you some crafty inspiration to paint your own Valentine’s Day Painted Jewelry Box?
YOU MAY ALSO LIKE TO SEE:
PAINTED PICTURE FRAME FOR VALENTINE’S DAY
HOW TO PAINT AND DECORATE A PAPER MACHE BOX

CLICK THE LINKS BELOW TO SEE MORE VALENTINE CRAFTS FROM THE “UNDER 10 ON THE 10TH” BLOGGERS!

Tammy @ PATINA AND PAINT
Terrie @ DECORATE AND MORE WITH TIP
Patti @ PANDORA’S BOX
Niki @ LIFE AS A LEO WIFE
Allyson @ Southern Sunflowers (that’s me)
Sharing my Valentine’s Day painted jewelry boxes at these fabulous blogs!

ABOUT THE AUTHOR
AllysonAllyson is the founder and content creator of Southern Sunflowers. She shares tutorials for DIY crafts and decor on a budget.
these are both super cute Allyson! Love the mandala heart and the felt lining on the inside is so smart!
Thank you, Jenna! I’m happy you like my painted boxes. They were fun and relaxing to paint!
These are adorable Allyson! You are definitely a better painter than me! I love the look of mandalas but I don’t think mine would turn out as well as yours. You’ve definitely made me want to give it a try! I can’t believe these were your first tries. Beautiful!
Happy hopping!
Niki ~ Life as a LEO Wife
Thank you for the compliments, Niki! I loved making the designs so much that I think I’ll have to invest in a ‘dotting kit’ of some sort to get a larger range of dot sizes.
Such cute boxes you shared with us. Love them both. Great idea to give a little gift to my kiddos. Thanks!
Thanks, Terrie! I was fairly happy with my first try at Mandala dotting. Overall, I love my little boxes, too. 🙂
Oh my goodness, they are beautiful. How talented you are! Thank you for sharing the idea.
Thank you for the compliments, Corine! So glad you like my boxes. 🙂
Wow! How cute are these? I love them! You did such a great job with these. I have seen these on rocks and a few other things but never thought to do something like this. They would make great gifts on their own but would also be wonderful to hide tiny gifts into. I am definitely going to be giving it a try. Thanks so much for sharing Allyson!
Thanks, Tammy! So happy I gave you the inspiration to dot some designs, too. It was actually relaxing to paint all those dots!