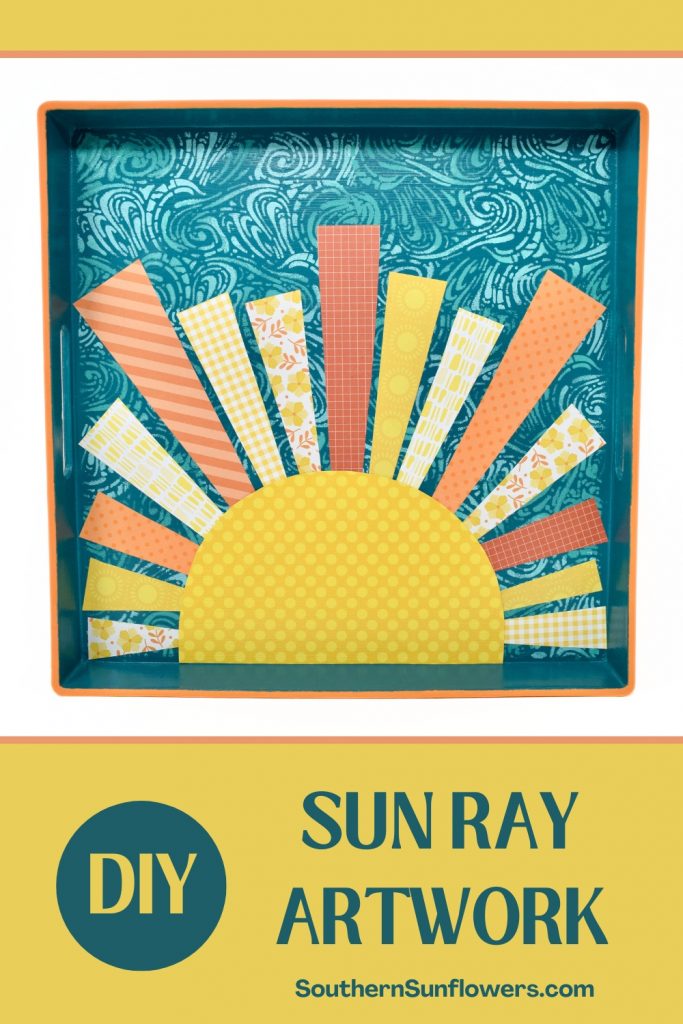
Let’s make a whimsical art project! My sunburst artwork made with paper is a fun DIY craft that you can create using paint and a variety of scrapbook papers.
You’ll have lots of fun choosing all the colorful patterns to make your sun rays. I always enjoy checking out the rows and rows of scrapbooking paper at JoAnn’s. It puts my creative thoughts in motion!
Follow my tutorial to find out how I made this pretty sunshine art project!

As an Amazon associate, I earn from qualifying purchases at no additional cost to you.
SUNBURST ARTWORK MADE WITH PAPER DIY
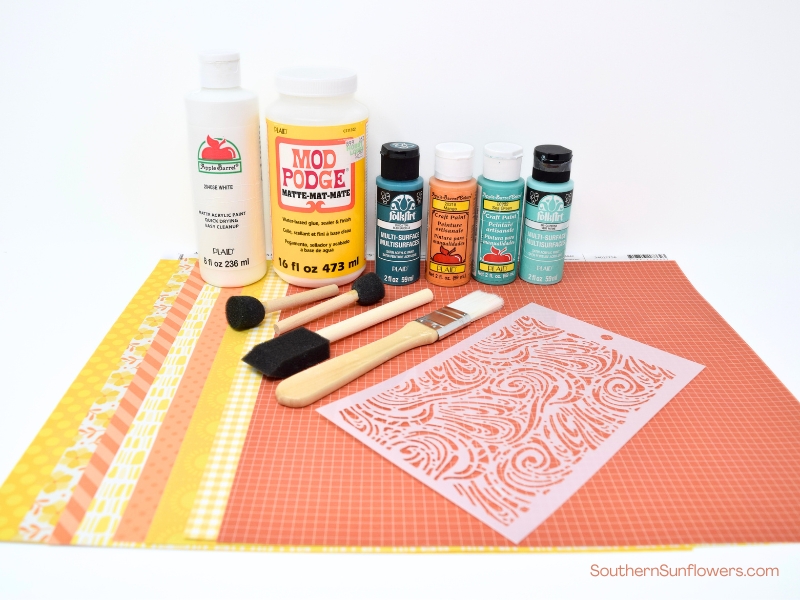
SUPPLIES NEEDED:
- thrift store item or art canvas
- scrapbook paper in orange and yellows
- stencil with swirls
- Mod Podge
- acrylic craft paints
- foam pouncers
- paint brush
- artist brush for touch-up
- scissors
- pencil
- ruler
- paper towel
- white spray paint (if needed)
CHOOSE A SURFACE FOR YOUR SUNBURST ART
- SURFACE IDEAS
- art canvas
- shadow box
- unfinished craft wood
- thrift store item
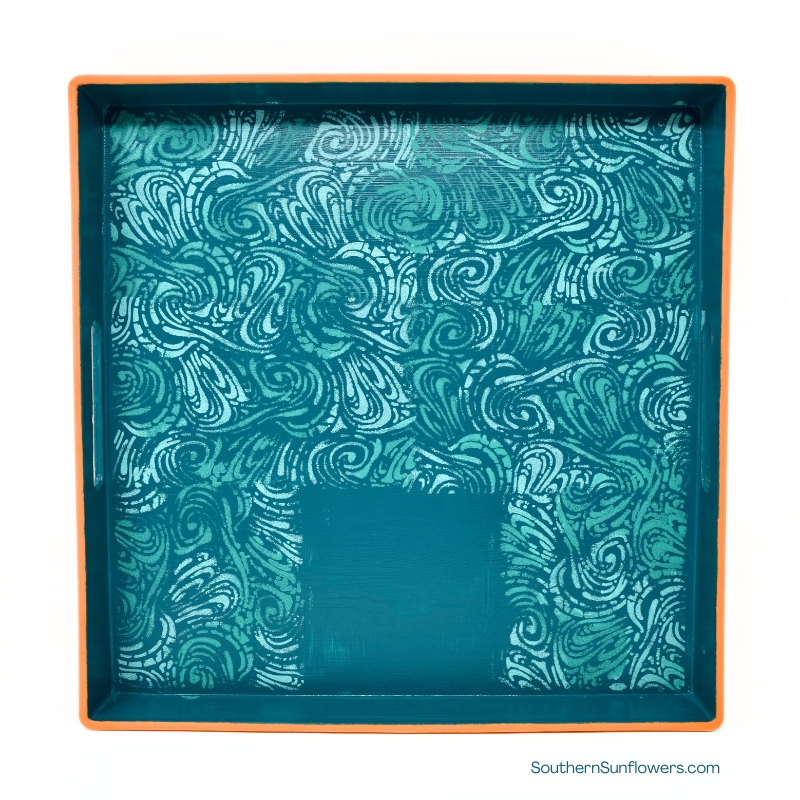
I chose to makeover a thrift store tray that I had on hand and I plan to display my artwork just by propping it up.

PREP THE ARTWORK SURFACE
If you use something similar to my tray that has an inset, you can tape off the top edge with painter’s tape to create crisp painted sections with different colors of paint.
I painted the top edge and outer sides of my tray with orange and the inset and base with a dark blue/turquoise.
TIP: You may need to use one coat of white spray paint for a base coat if your thrifted item is a dark color. I also painted one to two coats of white craft paint on top of that.

HOW TO PAINT THE SUNBURST ART BACKGROUND
Once the dark turquoise base coat is complete, use two lighter paint shades and a swirly stencil to pounce on the patterned sky.
- Squirt 2 piles of paint on an artist palette.
- Use 2 pouncers to alternate the colors on the stencil.
- Work in sections when using the stencil, overlapping a bit with each new section.
- Be sure to off load some paint from your pouncer brush before each section you paint.
- Hold the stencil down and use pouncer #1 to cover some areas of the stencil.
- While still holding the stencil in place, use pouncer #2 to cover the rest of the stencil.
- Rotate the stencil as you go along so that the pattern will not look the same side by side.
- As seen below, you can see how I alternated the 2 paint colors.
TIP – Use a hair dryer to dry each stenciled section before going to the next section to prevent paint transfer.

I didn’t bother stenciling some of the area where the sun half circle was going to be placed.
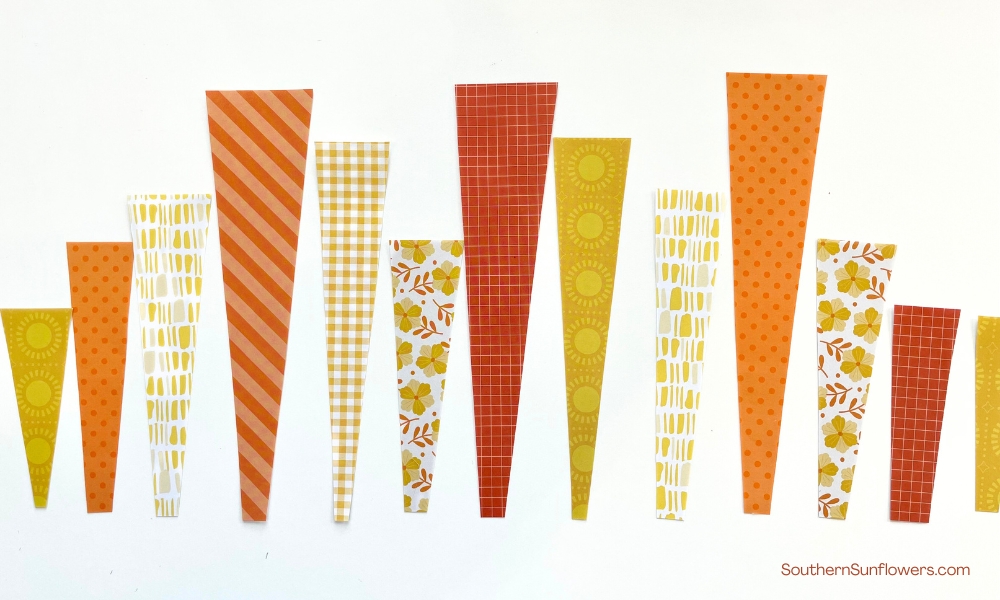
HOW TO MAKE THE SUN RAY PAPER STRIPS
I started off by guessing what size I might need. Using my favorite Fiskars ruler, I started each angled paper strip starting at a bottom corner, as seen below, and chose my angle at 3 and 9. The other two sizes were at 3 and 10, and 3 and 11.
I measured and marked on the back side of each piece of paper so I didn’t have to worry about pencil marks showing on the front side.
The sizes can be altered after cutting where needed as you get into arranging your sun rays.

Alternate and space the dark colors among the light colored paper strips so that the colors look somewhat evenly dispersed by different color shades.
TIP – I recommend using a nice quality of scrapbook paper as the cheap stuff is much harder to work with when gluing.
ATTACH THE SUN RAYS
Lay all the paper pieces in your desired areas before gluing anything down. Cut to alter the sizes if needed.
Use a skinny sponge brush to apply Mod Podge to some of the center portion of the half circle, leaving about 2 inches unglued to allow room to stick the sun rays underneath.
Begin gluing the sun rays into place. Carefully lift the half circle at each sun ray to allow room to stick the paper underneath. Continue like so until each strip is glued into place.
Carefully, lift the edges of the half circle and apply Mod Podge underneath.
TIP – Keep a wet paper towel at your side to wipe your fingers after glueing each paper strip to prevent the glue from getting your fingers all sticky and making your paper project a mess.
OPTIONAL – Applying Mod Podge on the entire artwork design depends upon what art surface you end up using and how much it’s going to be touched. I chose not to Mod Podge the top of my project.
I hope you have lots of fun creating your whimsical sunburst artwork!

YOU MAY ALSO WANT TO SEE THESE RELATED ART PROJECTS:
DOLLAR TREE “SHINE BRIGHT” STENCIL CRAFT
HOW TO UPDATE A THRIFT STORE FIND WITH PAPER FLOWERS
DIY PAINTING IDEA FOR A WOOD SERVING TRAY
It’s time for another monthly Sustainable Craft Challenge, where my blogger friends and I create an eco-friendly project which we “use it up,” recycle, or upcycle a craft or home decor. Our August theme is “sunshine.” Be sure to click the links below to see many more sunny decor and craft ideas!
NOW, SEE MORE THEMED “SUNSHINE” PROJECTS FROM MY CREATIVE BLOGGING FRIENDS!
Julie @ Sum of their Stories ~ Sunburst Greeting Card made with Old Magazines
Terri @ Our Good Life ~ DIY Resin Suncatchers
Purple Hues and Me ~ Sun Painting Bandana DIY
Mel @ Decor Craft Design ~ DIY Summer Sunflowers Sign
Stephanie @ Crazy Little Love Birds ~ Faux Stained Glass using Plastic Plates
Christine @ Christine’s Crafts ~ Easy Button Flowers for Home Decor
Niki @ Life as a LEO Wife ~ Box Full of Sunshine with Free Printable
Sharing my sunburst artwork at these fabulous blogs!

ABOUT THE AUTHOR
AllysonAllyson is the founder and content creator of Southern Sunflowers. She shares tutorials for DIY crafts and decor on a budget.
Wow, the tray looks fun and bright now! It’s pretty and perfect for Summer look.
Thank you, Mel!
This is so cute! I love that you can still use it as a tray because the design is flat. We have so many boring trays, but this one is unique and screams summer! It’s great hopping with you! Pinned for my followers, & I’ll be sharing our projects on social media over the next few days.
Thank you, Niki! Yes, if I cover the sunshine design with Mod Podge I can definitely use it as a tray.
I love how happy this is! Such fun making this sun your own! The papers are gorgeous, too.
I’m happy you like my sun, Terri! I got most of the paper from JoAnn’s.
What a fun and creative way to make sunburst art, Allison! This certainly brightens up anyone’s day! Well done!
I’m glad you like my sunburst artwork, Gail!
These look amazing and I can’t believe how inexpensively they can be made. Thank you so much for sharing!
Thanks, Christine! I enjoyed “sunshine” hopping with you.
Allyson, this was such a great tutorial. Your sunburst artwork is colorful and can really brighten one’s day. I love how you did the sun rays. I think all the colors go so well with the background choice. Thank you for taking us through each step. 🙂
-Stephanie@crazylittlelovebirds@blogspot.com
Stephanie, I’m glad you thought my tutorial showed well and you like my sun rays. Thanks!
I love your take on sunburst art, what a lovely way to makeover an old tray and turn it into a work of art. The stencil effect is just gorgeous as a background and sets off the papers beautifully.
Thanks Julie! I was happy to see my stenciled sky turned out like I had envisioned.