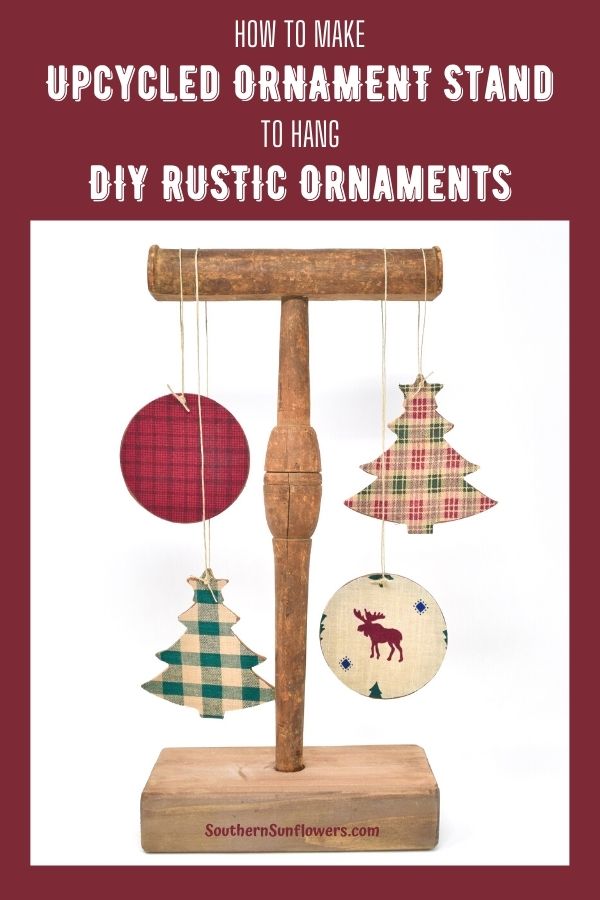
Today, I’m going to teach you how to make a upcycled wood ornament stand and rustic ornaments!
While thrift shopping recently, I found some interesting looking wood pieces that I thought had potential for future DIY projects. They were pieces and fancy trim broken off of furniture.
I purchased a few including this handle looking spindle wood piece that only cost $1.00. I think it’s actually from an antique weaving loom.
I can’t wait for you to see how my display stand turned out to be perfect for hanging Christmas ornaments!
HOW TO MAKE A UPCYCLED WOOD ORNAMENT STAND AND RUSTIC ORNAMENTS

BELOW IS MY THRIFTED WOOD PIECE FOUND FOR $1.00!

I decided on keeping the spindle as is instead of using chalk paint, which is another option you can try.
I just cleaned the wood and left the cracks and any imperfections for a true vintage and rustic look.
TIP: Since it will be easier for you to find a spindle without the top, you can also make a top for the spindle. Use the same steps that are listed for the base instructions, but with a smaller width of scrap wood.
As an Amazon associate, I may earn on qualifying purchases at no additional cost to you.
SUPPLIES NEEDED FOR THE BASE:
- scrap wood
- wood spindle
- table saw or hand saw
- drill
- twist bit
- woodboring bit
- orbital sander
- wood glue
- brown & black craft paint
- foam brush
- paper towel
- container for mixing paint
- pencil
- ruler

HOW TO PREPARE THE BASE
1. Cut scrap wood to desired size and mark the center.
Use a table saw or hand saw to cut your wood. Take a ruler and measure to find the center and mark with pencil.

2. Use a drill with a woodboring bit to make the hole for the spindle.
Choose a woodboring bit closest to the size of your spindle. Drill hole in wood and test to make sure your spindle will fit. Do not glue the two together until the base is stained.

3. Use orbital sander to smooth and round all sides and corners.
4. Mix water with Nutmeg Brown and black craft paint.
I didn’t have any stain on hand so I made my own. I used Nutmeg Brown and mixed it with water, then I added a little bit of black paint and mixed again.
TIP: Test your mixture on another piece of scrap wood to make sure you like the color. Adjust the mixture if needed.
Use the foam brush to apply your mixture all over the base then use paper towels to wipe off the color. You wood will look like it has been stained instead of painted.

5. After the stain has dried, use glue to attach the spindle to the base.
I couldn’t find my wood glue, so I used clear Power Grab Ultimate. I got a little bit of the glue on my base and it did not clean up well.
HOW TO MAKE RUSTIC ORNAMENTS
SUPPLIES NEEDED:
- wood shapes
- fabric scraps
- Mod Podge
- hemp cord
- sharp pointed scissors
- pencil
- foam brush

I purchased the Christmas tree shapes at the Dollar Tree and the circles at Walmart.
I already had the fabric scraps on hand, but Walmart and Jo-Ann Fabric sells inexpensive fat quarters. (Fat quarters are 18 x 22 and are packaged folded up into a square or rolled up.)
HOW TO MAKE THE ORNAMENTS
1. Place wood shapes on top of the fabric and trace each shape.

2. Use sharp pointed scissors to cut along your tracing marks.
Cut your shapes closer to the inside of your tracing marks. After testing the cut out size on the shape, I still had to go back and trim the fabric a little more, so that the fabric didn’t hang over the wood shape.

3. Paint the sides and edges of the wood shapes with brown craft paint on the front and back. Let dry.

4. Use a foam brush to apply Mod Podge to the shape.
Brush on a very light coat of Mod Podge. Carefully place the fabric shape on top of the wood shape.
TIP: Depending on the wood shape you purchase, you may find it easier to apply glue on half of the shape, place fabric, then brush glue on the other half and press down the rest of the fabric shape.

Will you try your hand at making your own wood ornament stand and rustic ornaments?

YOU MAY ALSO LIKE TO SEE THESE UPCYCLED PROJECTS:
CHRISTMAS TREE SHAPED FABRIC PILLOW NO SEW TUTORIAL
HOW TO MAKE FARMHOUSE CHRISTMAS ORNAMENTS
DIY THRIFT STORE WOODEN HEART MAKEOVER
It’s time for the monthly “Do it Over Designers” which is a group of 13 creative bloggers who gather together to share their “Recycle/Upcycle/DIY” projects with all of our readers. You’ll find links to their projects at the end of my post, so be sure to visit each one. Don’t miss out!
CLICK BLUE LINKS BELOW TO SEE MORE UPCYCLE / RECYCLE / DIY PROJECTS!

The Apple Street Cottage ~ Unique Creations by Anita ~ Modern on Monticello ~ Purple Hues and Me ~ Our Hopeful Home ~ Exquistely Unremarkable ~ Doodle Buddies ~ Pandora’s Box ~ Birdz of a Feather ~ Little Vintage Cottage
Sharing my farmhouse ornaments at these fabulous blogs!

ABOUT THE AUTHOR
AllysonAllyson is the founder and content creator of Southern Sunflowers, which shares tutorials for DIY crafts and decor on a budget.

Love this Allyson! Just reminds of the homespun Christmases we used to have! Thank you!
Denise, I’m happy you like my project! Thanks for visiting. 🙂
********************************************************
Thank you for sharing at #OverTheMoon. Pinned and shared. Have a lovely week. I hope to see you at next week’s party too! Please stay safe and healthy. Come party with us at Over The Moon! Catapult your content Over The Moon! @marilyn_lesniak @EclecticRedBarn
********************************************************
Marilyn, thank you for always hosting a fun party!
What a great idea! I actually have a few ornaments that I like to display separately, instead of on the tree, and I absolutely love this idea. I love the simple, rustic look of it. So creative! Thanks for sharing the tutorial!
Amy, thank you for your compliments! That makes me happy you like my upcycle. Thanks for dropping by!
What a creative idea Allyson ! Really fabulous. And your ornaments look darling as well.
Naush
Naush, thank you for your compliments! I’m happy you like my upcycle and ornaments. 🙂
This was a very clever and creative idea which turned out great. I have never heard of using nutmeg as a stain so thank you for the tip.
Glad you like how my upcycle turned out, Anita! I made the stain with Apple Barrel’s ‘brown nutmeg’ craft paint.
Absolutely adorable and I love that you kept the spindle natural.
Cindy
Thank you, Cindy! The more I looked at the wood piece, I just couldn’t cover up the character. I even love the big crack in the wood LOL!
What an interesting piece – I wonder what it was? Love how you upcycled it though, and I love the wood!
Ann, I googled some keywords trying to find out what it was, but no luck. Glad you like how I used it! 🙂
We certainly don’t have a lot of display space in our house, so a decorative project like this is so ideal Allyson! Love that you left the wood rustic. The project turned out amazing.
Sara, I’m glad I left the wood as is, too, because I hated the thought of covering up the character. So happy you like my upcycle!
Well this whole set up is just darling…and would look wonderful in my very rustic living room. Thanks for sharing!
Kim, so glad you like my upcycle! I’m happy with how it all turned out and works with my Christmas decor colors.
Your ornaments are lovely! What a great upcycle. Thanks for sharing and wonderful crafting with you.
Chas, thank you for your compliments! Nice crafting with you, also. 🙂
I would have probably left that piece of wood behind because I would not have thought of what to do with it. Great project and very creative way to reuse something. Love the ornaments too.
Donna, you should see the other wood pieces I bought at the same time Lol! They are going to be harder to figure out what to do with them, but they were so unique looking I couldn’t leave them behind.
How creative and unique to make an ornament stand for hanging rustic ornaments, Allyson! It blends in so well with the current holiday design themes! And the adorable ornaments you made are quite trendy and stylish using pretty plaid fabrics!
Thanks, Gail! When I first saw the wood piece, I thought jewelry stand, but I’m glad I had a lightbulb moment for making an ornament stand instead because I like it much better.
This is a great upcycle! I wonder what that spindle thing was originally for… interestingly, I have a top that looks just like that but no spindle!
Tania
Thank you, Tania! I googled some keywords trying to find out about the piece, but no luck. Funny you have the top piece!
This is a clever project, especially to highlight special ornaments that might get lost on a tree!!
Thanks, Patti! Yes, my darker ornaments would definitely get lost on a tree. Having fun crafting with you 🙂