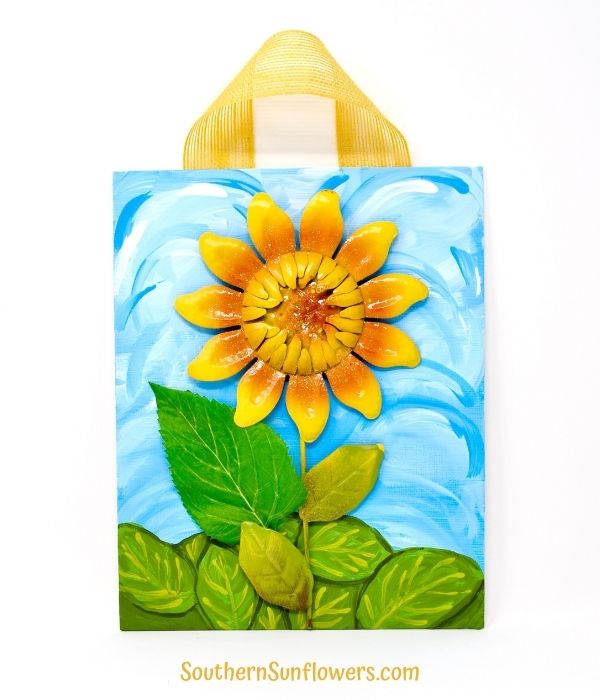
Who loves sunflowers as much as I do? I created my Dollar Tree sunflower canvas craft to celebrate the sunflower fields that are just hitting their prime in my neck of the woods. They are truly spectacular to view!
No need to be an artist, so follow along as I show you, step-by-step, how to create your own sunflower art.
DOLLAR TREE SUNFLOWER CANVAS CRAFT
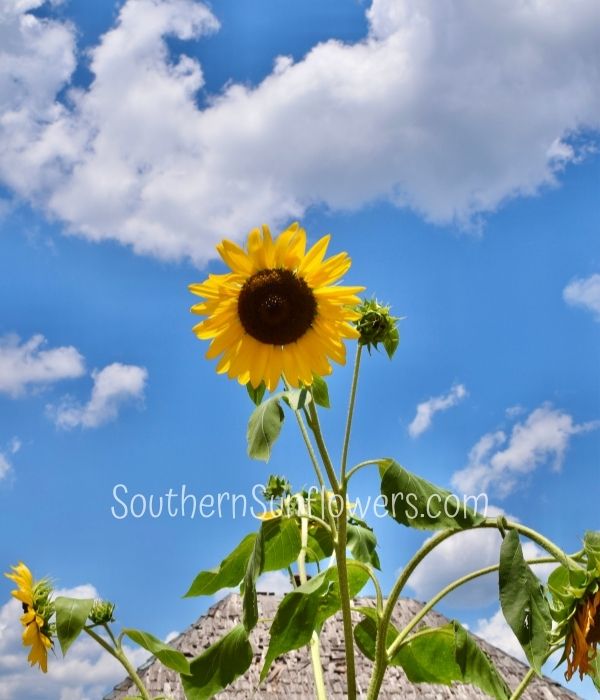
I snapped this sunflower photograph recently, and my photo is what inspired me to create my sunflower canvas craft.
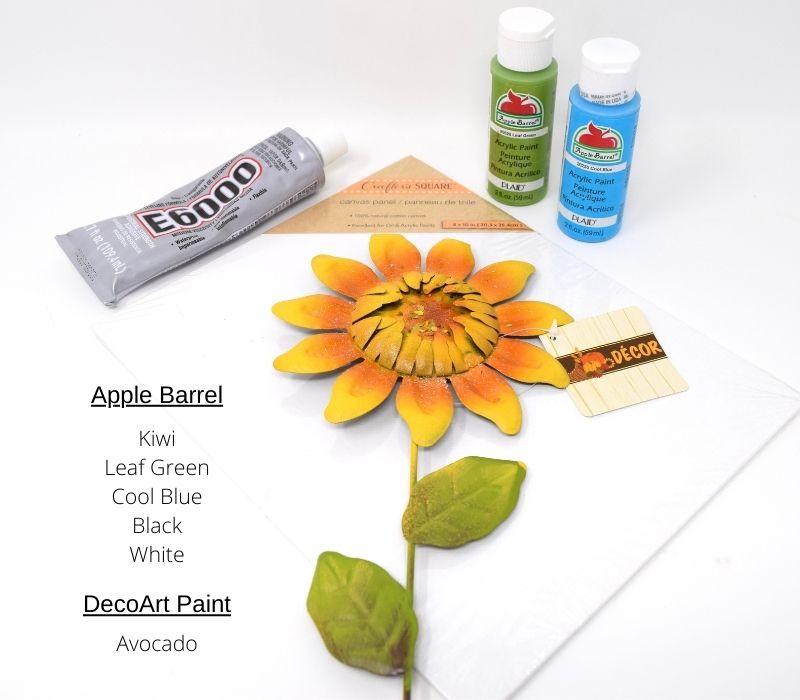
I also found a metal sunflower at the Dollar Tree which made my idea come together perfectly.
SUPPLIES NEEDED:
- 8 X 10 canvas – Dollar Tree
- metal sunflower – Dollar Tree
- E-6000 glue
- craft paint – colors listed in photo above
- medium artist brush
- small artist brush
- pencil
- wire cutter
- burlap ribbon
- one green florist leaf
HOW TO MAKE A SUNFLOWER CANVAS CRAFT
STEP 1: DETERMINE THE PLACEMENT OF THE SUNFLOWER
Place the sunflower on the canvas and determine how much space you want to be between the top of the canvas and the top of the flower. I left 1/2 inch.
Mark the metal stem at the bottom where you need to cut. My husband helped me with this step and used wire cutters to cut the metal stem at my mark.
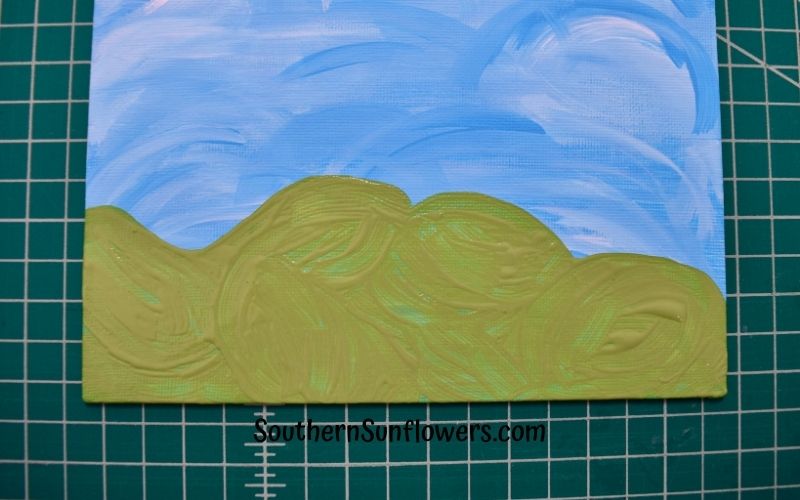
STEP 2: PAINT THE SKY AND CLOUDS
You really don’t need any artistic skills to paint the sky as it doesn’t need to be perfect. It actually looks more artsy when you’re not trying to be precise.
Use Cool Blue and White and a medium size artist brush to make your clouds and sky. Your objective is to make a “suggestion” of clouds in the sky.
TIP: Do not wait for the paint to dry in between steps. Paint wet-on-wet.

- Use the blue paint to cover the entire canvas, painting in a horizontal direction.
- Mix White with Cool Blue paint to randomly swirl around on top of the solid blue, while also leaving some solid blue in areas.
- Use Cool Blue paint to loosely paint arcs.
- On your paint palette, brush most of the blue paint off, then loosely make white arcs.
- Mix White with Cool Blue paint to randomly blend arcs so they aren’t too stark.
- Mid canvas and downward, make swirls and arcs more blended and subtle, as seen in the photo above.
Remember, painting the sky doesn’t need to be perfect. Just paint loosely and you’re good to go.
STEP 3: DETERMINE WHERE TO PAINT THE LEAVES
Once the canvas is completely dry, place the sunflower on the canvas as well as the leaves. I ended up just using one leaf.
Your’e doing this in order to get an idea of where the leaves need to be painted. Use a pencil to mark your reference points, so you will not paint past those points as shown in the photo below.

STEP 4: PAINT THE LEAVES
*** You are still painting wet-on-wet while creating your leaves ***
Using a smaller brush than used for the sky, I loosely painted with Leaf Green where I envisioned my leaves. As you can see in the photo below, 5 areas are specifically going to be leaves.
I then painted shadows around my leaves using Avocado.

Mix Avocado and Leaf Green to randomly blend in a medium green on the leaves. On your paint palette, brush off most of the paint on your brush, then use Kiwi Green to paint leaf veins.
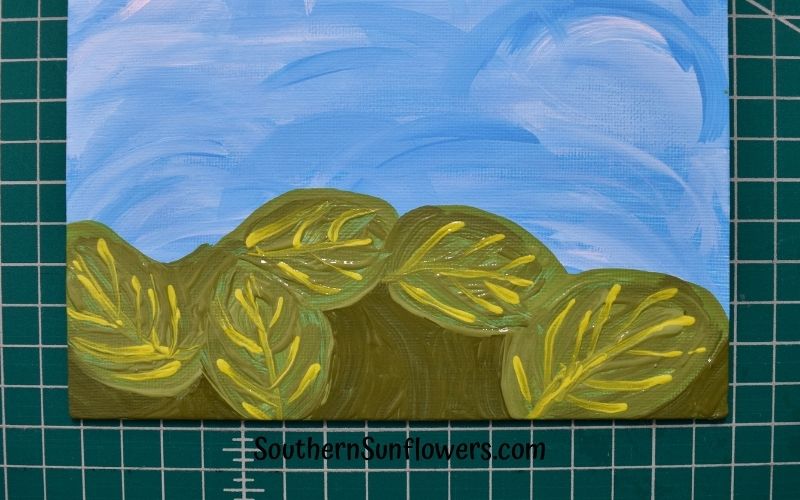
At this point in painting the leaves, I decided to:
- add more leaves in the blank spots
- soften up the dark Avocado areas
- outline the leaves using a mixture of Avocado with a touch black
- soften random outlined areas using a mixture of Avocado and Leaf Green

STEP 5: ATTACH THE SUNFLOWER
Your metal sunflower will be wobbly on the canvas and you’ll be wondering at what areas will it stick to the canvas. I chose near the bottom of the stem, and an area that stuck out the most on the back side of the sunflower portion.
I applied a generous amount of E-6000 glue to those two areas. You may decide you need to glue more areas. Use two heavy items to place on top of the flower and on the stem. It takes longer for E-6000 glue to dry compared to using a hot glue gun.
STEP 6: ATTACH THE LEAF
Once the glue on the metal was dry, I used a dab of the same glue (overkill for a leaf, but it was handy) to attach the leaf.
STEP 7: ATTACH THE RIBBON HANGER
I already had my burlap ribbon on hand, but Dollar Tree also carries burlap ribbons. Cut 11 inches of ribbon, and on the back side of canvas, glue 2 inches of ribbon on each side.
Doesn’t that look like an awesome sunflower and painting craft project to create? Hop on down to the Dollar Tree and grab your supplies!
MORE DOLLAR TREE CRAFTS YOU MIGHT LIKE:
DOLLAR TREE STENCIL CRAFT ON CANVAS
DOLLAR TREE CANVAS IDEA USING STICKERS


FOLLOW ME ON PINTEREST FOR LOTS OF CRAFT & BUDGET HOME DECOR INSPIRATION!
I joined a group of blogging friends for a fun monthly theme project. Our challenge for September was to create a Dollar Tree craft project to share with all our readers. After viewing my craft project, be sure to visit their projects that are pictured at the end of this post. Don’t miss out on more craft inspiration!
NOW VISIT MORE DOLLAR STORE CRAFT IDEAS BELOW!
Purple Hues & Me | Domestic Deadline
Southern Sunflowers | Stone Cottage Adventures
Comfort Spring | Cookies, Coffee, & Crafts
Slices of Life | Sum of Their Stories
CLICK THE BLUE BUTTON AND YOU WILL BE REDIRECTED TO EACH PROJECT LINK.

ABOUT THE AUTHOR
AllysonAllyson is the founder and content creator of Southern Sunflowers, which shares tutorials for DIY crafts and decor on a budget.
Thank you for the step by step directions! That is such a great idea and turned out so well! Pinning -Marci @ Stone Cottage Adventures
I’m so glad you like my sunflower craft, Marci. Thanks for the pin and dropping by!!
This is awesome! I think I was with you when you took that photo which makes it all the more special! You know I love metal and that is a great project for sure!!
Yay, I got your sign of approval! Yes, that photo was taken on our day trip. Thanks for dropping in 🙂
I’m got to check out our Dollar Tree and see if they have the sunflower. Love your results
Thank you Auntie Judy! I got the very last one at my local store and I couldn’t grab it fast enough since they sell out of stuff so quickly.
Your step by step instruction on painting this is so easy to follow. Your sunflower canvas took me back to the sunflower farm which is my favorite place to visit. I love it!
Thanks, Jenny! I’m glad you think my step by step is okay to follow as I always wonder if it even makes sense. lol 🙂
I love how you created such different textures and layers with this beautiful art work. And you make it seem so easy too – lovely!
Glad you like it, Julie! I had fun putting it all together and I’m happy with how it turned out, too.
What a fun update, and of course I love the sunflower! Isn’t the dollar store great? So many possibilities and so inexpensive. Thanks so much for sharing.
Yes, love me some Dollar Tree… and sunflowers! LOL
I love your mixed media art project! That turned out great. Pinned.
Thank you Joanne! I got lucky finding that sunflower since it was the very last one. It helped bring my idea all together.
I love this! It’s a fun piece for early fall decor. Adding the painted leaves really makes it pop.
I’m so glad you love it, Beverly! I’m happy with how it turned out.
You are quite talented and creative, Allyson! Love your sunflower artwork! My mil was an artist, too, and she would also take pictures of the items she wanted to paint, as a reference.
Thanks for the compliments! I got lucky finding that sunflower so I could make it all come together and be similar looking to my photo.
What a wonderful idea. I would never have thought of adding the sunflower to canvas and painting the background. Beautiful!
Thanks, Carol! I was happy with how it turned out with the help of Dollar Tree.