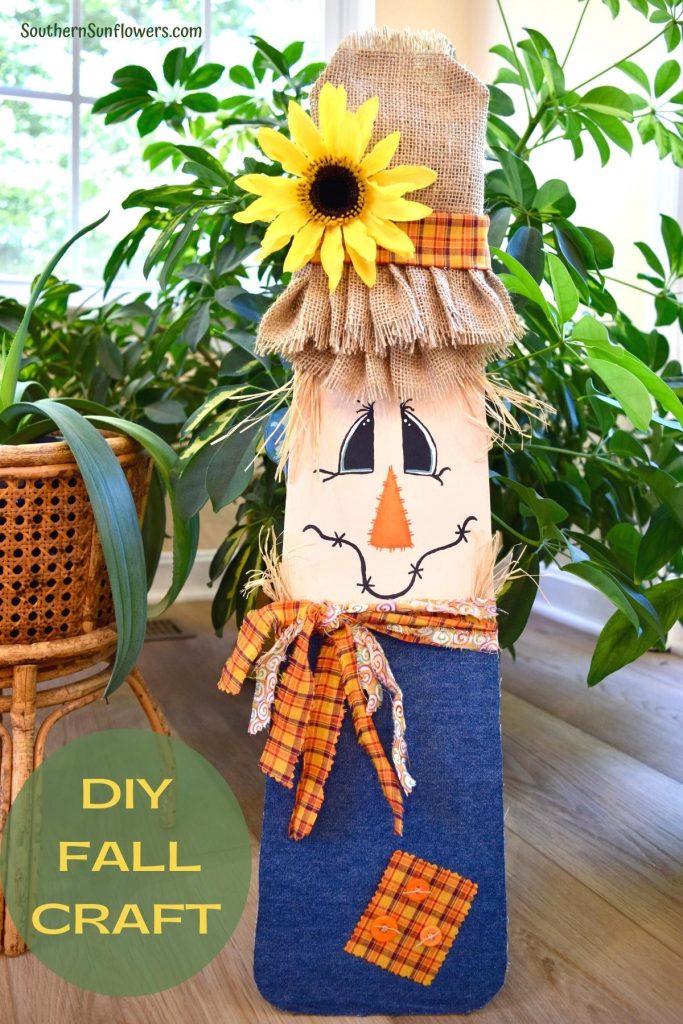
It’s officially fall now, so what better time to show you how to make a scarecrow ceiling fan blade. It’s the perfect DIY upcycled fall craft that you can have fun making and express your creativity!
If you’ve seen the old ceiling fan blades while thrifting then you’ve probably wondered what you can make using fan blades. See a list of more fan ideas for holidays and seasons below:

WHAT CAN YOU MAKE WITH OLD FAN BLADES?
There’s lots of fun ideas other than scarecrows, such as, characters with faces, painted scenes, and yard art fan blades. See a list of more fan ideas for holidays and seasons below:
- ghosts
- pumpkins
- turkeys
- snowmen
- Santa
- dragonfly
- sunflowers
- welcome sign
- chalk board
As an Amazon associate, I may earn from qualifying purchases at no additional cost to you.
HOW TO MAKE A SCARECROW CEILING FAN BLADE
SUPPLIES NEEDED TO MAKE A SCARECROW
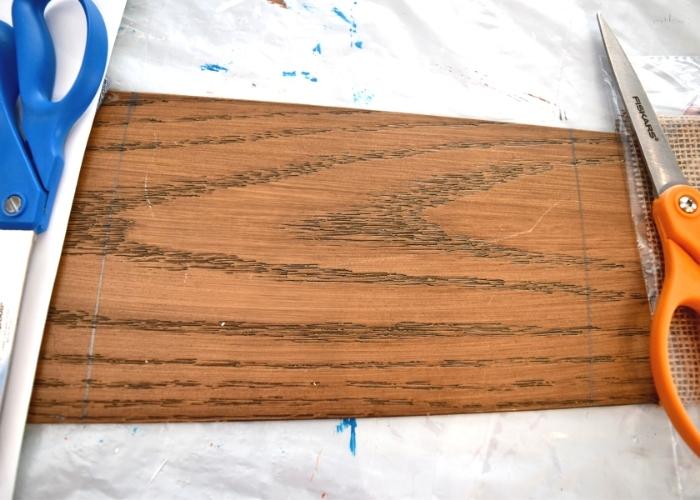
- thrifted ceiling fan blade
- burlap fabric
- denim fabric
- 2 patterned fat quarter fabrics
- faux sunflower
- raffia
- Surebonder glue gun (my favorite)
- Fiskars scissors (my favorite)
- Fiskars pinking shears
- artist paint brushes
- foam brush (optional)
- craft paint – orange, peach, white, blue, black
- black craft paint or Sharpie marker
- pencil
- orange buttons

HOW TO DECORATE A FAN BLADE
STEP 1 – MAKE SCARECROW PATTERNS
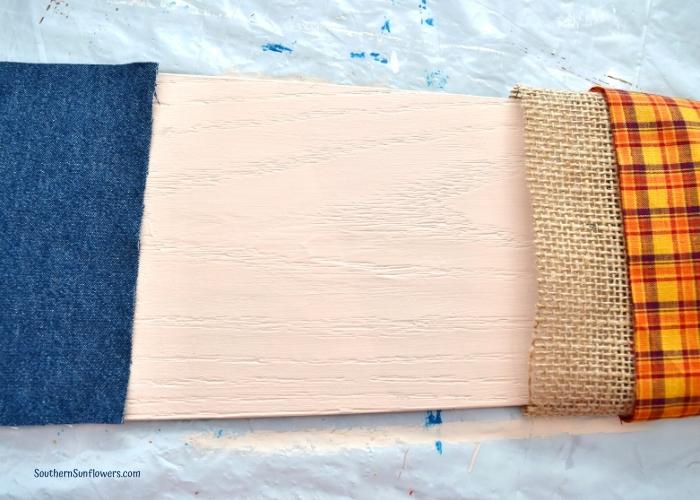
Make a pattern for the denim bottom portion of the fan blade. I use white stock paper to trace around the blade. I used the template to trace the pattern on the back side of the denim fabric, then cut out the traced markings.
Cut out a piece of burlap fabric that will wrap around the entire top portion of the fan blade. This eventually will become the hat.
Use hot glue along the edges of the denim fabric pattern and place into position. Leave about an inch at the top of the denim that is not glued down.
I waited to glue the burlap hat on until I was finished painting the face base coat just in case the placement needed to be adjusted.


STEP 2 – PREPARE THE FACE AREA
Fold back the unglued portion of the denim pattern and move the burlap fabric up a bit. Cover those ends with plastic wrap or paper to prevent face paint accidentally get on the fabric. You may need to place something with weight on top of those areas.
Mark with a pencil the face section that will be painted. Two coats will be needed for the face color.
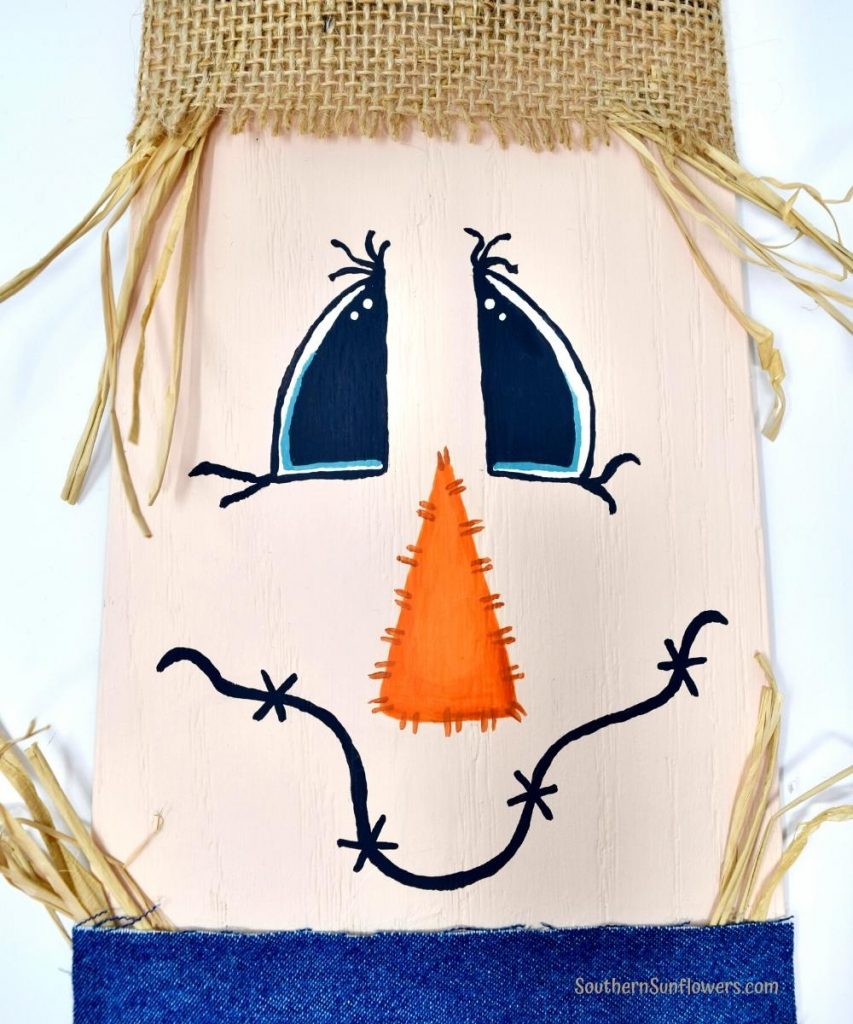
STEP 3 – GLUE HAT AND ADD RAFFIA
Determine the placement of your burlap hat. Turn the fan blade over and hot glue the vertical edges of the burlap together.
Carefully lift up the bottom of the hat and place some hot glue at the temple area. Then bunch some raffia together and stick into the glue. Do the same thing for each side of the neck area.
I lightly stuffed some raffia inside the hat, also. Insert it through the top of the hat. Pull burlap pieces at the top of hat to create a fringy look. Now, hot glue the top of the hat together.
STEP 4 – PAINT THE SCARECROW FACE
Using a pencil, lightly draw facial features onto the face. Paint the features using an artist brush. I shaded the nose a bit, but that’s optional.
STEP 5 – PREPARE FABRIC PIECES FOR THE HAT
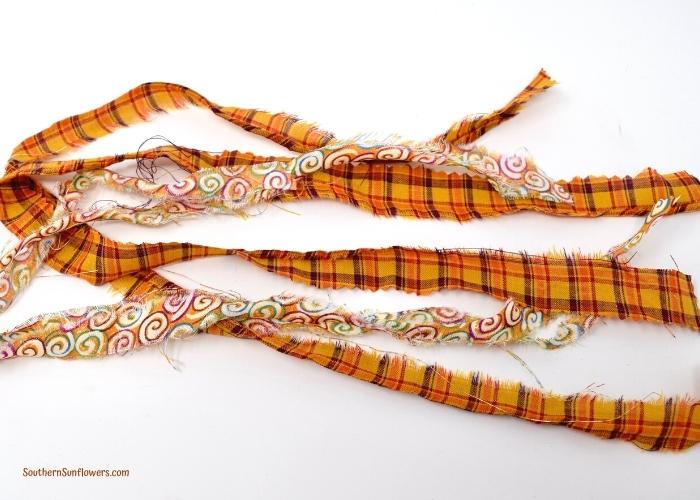
From the two patterned fabric pieces, you will need to tear long strips that will eventually be tied around the scarecrow neck. Use scissors to snip at the fabric edge and then rip apart along each slit.
I used pinking shears to cut anywhere the fabric looked too perfect including the ends.
Cut about a 1-inch strip from one of the cotton patterned fabrics that will be long enough to surround the burlap hat.
Also, cut a long piece of burlap that will be used to make a pleated hat brim.
IMPORTANT TIP – Cut a burlap piece much, much longer than you think you need so you don’t have to join 2 sections together like I did.

STEP 6 – MAKE THE BURLAP HAT BRIM
This is the most tedious part of making the scarecrow. You’re going to be pleating the burlap fabric.
Pull some of the burlap weave from the strip to create a fringe look.
Glue the burlap end down on one side of the hat. Try to get as close to the side as possible.
From the glued down end, start by making your first pleat, glue it in place, make a pleat, glue it in place, and continue like so until you’ve reach the other side of the hat.
IMPORTANT TIP – Make sure your brim is in the correct placement and not too high up like mine was. I ended up having to glue in a second pleated section underneath the top one.

STEP 7 – FRINGE THE RAFFIA
Peel apart each raffia end, peeling up as far as you can. This will create a fringy look.
STEP 8 – ATTACH THE HAT TRIM AND THE SUNFLOWER
Position the patterned fabric trim to cover the top of the pleated brim. Wrap the trim around to the back of the fan blade. Use hot glue on the back side to join the trim.
Pull off the plastic green pieces that are under the sunflower. You may need to snip it off. Use hot glue to attach the flower to the hat.
STEP 9 – MAKE THE NECK TIE
Gather the torn fabric strips together making sure they’ll be at varying lengths. Tie around the neck area and to one side. Use hot glue to attach the tied knot to the neck.

STEP 10 – MAKE THE BUTTON PATCH
Cut a square or rectangle piece of patterned fabric using pinking shears. Hot glue the patch onto the denim.
I used some leftover burlap pieces that were pulled off at the top of hat to weave through the button holes. I then tied the ends together. Hot glue the buttons on the patch.
Whew, that sure was a long tutorial, but I think the end result is worth all the steps it takes to make my scarecrow ceiling fan blade! Let me know what you think about my upcycled fan blade in the comment section below.

YOU MIGHT ALSO LIKE MY OTHER THRIFT STORE MAKEOVERS:
THRIFT STORE UPCYCLED WOOD PUMPKINS
HOW TO PAINT A THRIFTED GLASS VASE
It’s time for the “Do it Over Designers” group to share our makeovers of items old or unused and making it into something new. These items can be found in closets, barns, thrift stores, yard sales, you name it. Visit the links at the end of my post to see 6 more makeovers from talented bloggers!
CLICK THE LINKS BELOW TO SEE MORE UPCYCLES AND MAKEOVERS!

MEET YOUR “DO IT OVER DESIGNERS”
The Apple Street Cottage ~ The Book Witch
Birdz of a Feather ~ DIY Record Player Stand
Exquisitely Unremarkable ~ Wooden Shelf Makeover
Purple Hues & Me ~ Truck Bed Pumpkin Theme Hanging
Southern Sunflowers ~ Scarecrow Ceiling Fan Blade (that’s me)
Sum of Their Stories ~ How to Upcycle a Cloth Gift Bag to Cover a Store Logo
Tea and Forget-Me-Nots ~ Coffee Table Makeover using Chalk Paint and a Transfer

ABOUT THE AUTHOR
AllysonAllyson is the founder and content creator of Southern Sunflowers. She shares tutorials for DIY crafts and decor on a budget.
Very creative. Fabulous job.
Rebecca, thank you for the compliments on my scarecrow upcycle and thanks for dropping by!
Allyson,
OMG, this is so adorable. Congratulations, you are being featured on Thursday Favorite Things Party. I hope you stop by.
https://www.eclecticredbarn.com/2022/10/fall-foliage-and-tft-party.html
Hugs,
Bev
Beverly, I appreciate you featuring my upcycled scarecrow!
So cute! I’ll be featuring it on tomorrow’s Crafty Creators!
Niki, thank you so much for featuring my scarecrow fan blade!!
Too cute! I love that you used actual denim for his overalls.
Thank you, Alexandra! The scarecrow’s denim came thrift store jeans.
I love his painted face. It’s so happy.
Thank you, Michele! I like how his face turned out, too.
I love this scarecrow! You did a wonderful job painting it, and I love the neck tie and patch with buttons. Too cute!
T’onna, thank you for all the compliments on my scarecrow! 🙂
Thanks for sharing with us, I’m featuring you this week when the next To Grandma’s house we go link party starts! Happy October!
Thank you for featuring my scarecrow!!
LOVE THIS, Allyson! We will be featuring you starting Wednesday at the Creative Crafts Linky Party!
Creatively, Beth
Thanks so much for featuring my scarecrow!!
CONGRATS Allyson! Your post is FEATURED at A Themed Linkup 122 for Trays from the previous linkup for Fall Crafts and Décor.
Dee, thank you so much for featuring my scarecrow fan blade!
So cute Allyson! I am crazy about scarecrows and this one is adorable. Pinned!
Denise, thank you for pinning my scarecrow!
Your scarecrow is simply adorable — not too scary though. I love him! Smiles, Linda at Paper Seedlings
I’m glad you like my scarecrow, Linda. Thanks!
Allyson, this could not be cuter!! I love the way you did the hat and his face is adorable! Great tutorial too, LOVE it!
Jenna, thank you for all the compliments!!
Love this guy’s expression!!
Thanks, Michele! My scarecrow face turned out way better than I thought it was going to, so I’m happy about that.
Oh, WOW! That looks so cute! And, you used two of my fav things – denim and burlap!! Thanks so much for linking up at A Themed Linkup 121 for Fall Crafts and Décor. Shared.
Dee, those are my two fabric fabrics, too. Thanks for sharing my scarecrow!
Aww, that’s cute! I have a ghost I made from a fan blade YEARS ago!
Thanks, Tania! I bet your fan blade looks adorable as a ghost.
What an adorable idea for recycling an old ceiling fan blade (and fabrics) for Fall!
Marie, I’ve had that fan blade forever waiting to be upcycled. I was excited that the scarecrow idea finally came about.
He’s just lovely! What a fun project. All the details you added are just perfect, and his face is just right.
Thanks for the compliments, Julie! Even though the brim of the hat looks wonky, I was happy with how it turned out overall.
Cute project!
How creative and unique, Allyson! Absolutely adorable! I’ve never seen fan blades decorated like this! It’s the perfect addition to fall and Halloween decor!
Thanks for the compliments, Gail! It was a fun fall project.
Your scarecrow is adorable, Allyson and you have a talent for drawing facial features – something I DON’T have! HaHa! Old fans show up at yard sales all the time…I may need to grab one now….
Thank you, Ann! I got my fan blade at a ReStore where they have them already detached from the fans.
I would never have thought about repurposing a fan blade, what a great idea. This is so cute.
Rachel, I’m so glad you think my scarecrow is cute. I’m partial to him, also!
Oh my goodness!! This is amazing!! I use old fan blades all the time, but I’ve never made a scarecrow. Yours is just darling. I have an empty blade in my kitchen right now, just waiting to be transformed. Guess what I’ll be making? Happy Fall!
Thanks for the compliments, Kim! I’m sure you’ll enjoy making your fan blade into a scarecrow as much as I did.
So adorable Allyson! I’ve got so many pinking shears thanks to Hubs’ sewing machine hobby – now I know what to do with them 🙂
Sara, I don’t use the pinking shears too often, but I love how the edging looks on projects.