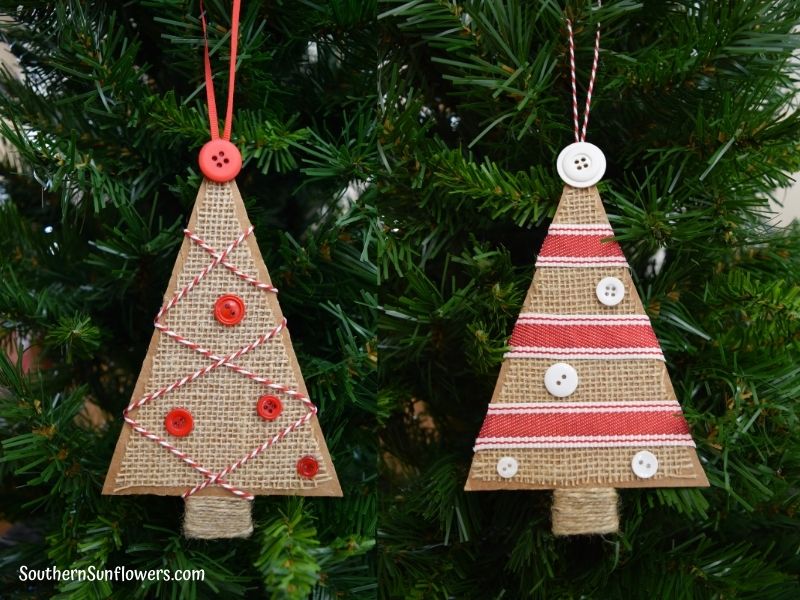
Since Christmas will be here before you know it, I’m going to show you how to make farmhouse ornaments using cardboard.
These Christmas ornaments are quick to make and you’re likely to already have most of the craft supplies on hand.
Not only can you use these farmhouse style ornaments on your tree, but they would also be great as gift toppers.
As an Amazon associate, I may earn from qualifying purchases at no additional cost to you.
HOW TO MAKE FARMHOUSE ORNAMENTS USING CARDBOARD
SUPPLIES NEEDED TO MAKE THE ORNAMENTS
- cardboard
- cardstock
- burlap
- brown twine
- red & white bakers twine
- red buttons
- white buttons
- striped ribbon
- red ribbon
- Mod Podge
- paint brush
- scissors
- ruler
- pencil
- black marker
- hot glue gun

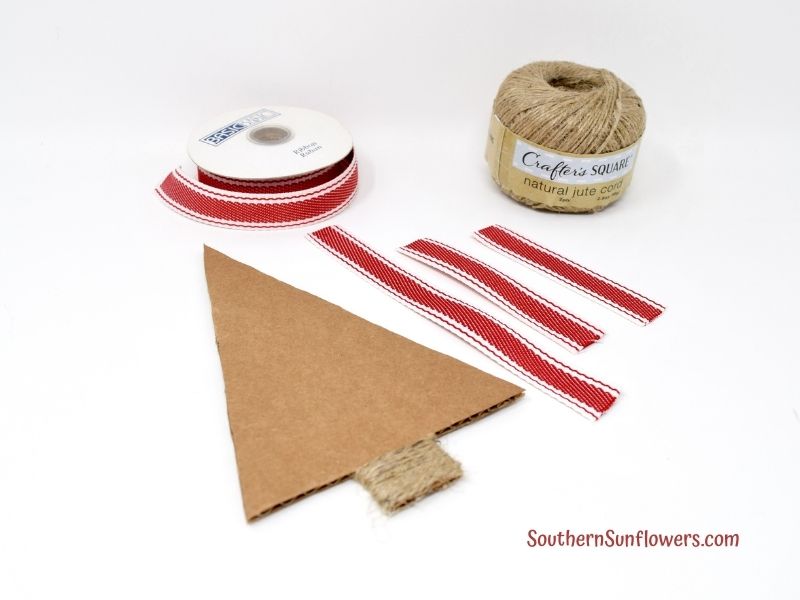
HOW TO MAKE THE CHRISTMAS TREE PIECES
- Use a ruler to draw a tree shape on cardstock to your desired size, then cut out.
- Place the tree template on top of cardboard, trace with pencil, then cut out.
- Place the tree template on top of burlap, trace with marker, and cut 1/4 inch inward from your marker outline, so that the burlap piece will be smaller than the cardboard piece.

HOW TO MAKE THE FIRST FARMHOUSE ORNAMENT
1 – ADD THE BROWN TWINE
Unwind a significant amount of brown twine. Use the paint brush to apply mod podge to the back of the tree trunk.
Begin placing the twine at the top of the tree trunk. Add more mod podge on top of the beginning of the twine and press down with finger.
Hold the beginning of the twine and begin winding and wrapping the trunk, ending on the bottom back side. Add mod podge under and on top of the end of twine, press down with finger. Let dry before the next step.

2 – ADD THE BURLAP
Use the paint brush to apply mod podge to one side of the burlap piece. Place burlap on top of the cardboard tree, then press with fingers. The mod podge will dry clear. Let dry before the next step.
3 – ADD THE RED & WHITE BAKER’S TWINE
Unwind some of the baker’s twine. Add mod podge to the top back side of the tree trunk. Place the baker’s twine like seen in photo below, add mod podge on top of the baker’s twine, then press with finger.

While holding down the baker’s twine end, begin wrapping the twine around the tree using the numbered wrap steps seen in photo below.
Use a paint brush to dab mod podge on the side/edge of the cardboard at each point where the baker’s twine hits. This can be done along the way of wrapping or after wrapping.

4 – ADD THE RIBBON AND BUTTONS
Cut a piece of ribbon to desired length for hanging. Use hot glue gun to attach the ribbon ends to the top back of cardboard. Use the hot glue gun to attach the buttons.
HOW TO MAKE THE SECOND FARMHOUSE ORNAMENT
Follow the same instructions, as seen above, for how to make the tree pieces, and for attaching the brown twine and burlap.
1 – ADD THE RIBBON, BUTTONS, AND HANGER
Cut three ribbon pieces that are long enough to extend past the angle of the tree, then place them on the tree with an even distance between each one.
Use the hot glue gun to attach the ribbon, then cut the ribbon ends so that they are even along the tree angle. Dab the ribbon edge with mod podge to prevent raveling.
Attach the buttons with hot glue. Cut a piece of baker’s twine to the desired length for hanging and glue the ends to the top back side of the cardboard.

I hope you love how my farmhouse ornaments using cardboard turned out as much as I do! Will you make yours to hang on a Christmas tree or use as gift toppers?


SEE MORE OF MY CHRISTMAS RELATED PROJECTS:
DIY DOLLAR TREE CHRISTMAS DECOR
This month, I joined a group of creative bloggers for the “10 on the 10th” challenge. Our objective is to share ideas with our readers that cost less than $10 which you can create on your own. Be sure to click their blog links at the end of this post to see their ideas. Don’t miss out!
CLICK THE LINKS BELOW TO SEE MORE HOLIDAY IDEAS TO MAKE FOR UNDER $10!
The Apple Street Cottage ~ Decorate and More with Tip ~ Pandora’s Box ~ The House House ~ French Ethereal

Sharing my farmhouse ornaments at these fabulous blogs!

ABOUT THE AUTHOR
AllysonAllyson is the founder and content creator of Southern Sunflowers. She shares tutorials for DIY crafts and decor on a budget.
Clever and cute ideas, thanks for the inspiration…
Thank you, glad I could inspire you!
Your ornaments are fabulous, Allyson. You’re being featured on the Little Cottage Link Party today. Merry Christmas!
Awesome, Kristie! Thank you very much for featuring my ornaments! 🙂
Allyson,
These Farmhouse ornaments are so adorable. Congratulations, you are being featured at Over The Moon Linky Party. I hope you stop by. https://www.eclecticredbarn.com/2020/12/over-moon-linky-party.html
Hugs,
Bev
How exciting, Beverly! Thanks for featuring my ornaments! 🙂
********************************************************
Thank you for sharing at #OverTheMoon. Pinned and shared. Have a lovely week. I hope to see you at next week’s party too! Please stay safe and healthy. Come party with us at Over The Moon! Catapult your content Over The Moon! @marilyn_lesniak @EclecticRedBarn
********************************************************
Marilyn, I always enjoy linking up to your party!
Hi Allyson, these tree ornaments are just adorable! thanks for the great diy, I just love them. I’m featuring this post on All About Home Monday evening. Thanks so much for coming by and joining in on the party!
How exciting, Debra! Thank you so much for featuring my ornaments! My first time ever being featured in your blog party, YAY. 🙂
Unos adornos muy bonitos y con un aire rustico que me encantan.
Saludos
I’m so happy you love my ornaments! Thank you for stopping by 🙂
So cute! Our church bazaar was 2 Saturdays ago and here I am, collecting ideas for next year already! Happy Thanksgiving!
It’s never too soon to plan ahead! I hope you enjoy making the ornaments. Thanks for dropping by!
These are so adorable and your tutorial is great. pinned
Anita, thank you for the compliments and the pin! Happy Thanksgiving 🙂
These are just the cutest Allyson! I am pinning this for later. I think they will be so much fun to make with my daughter if the travel restrictions are better by Christmas. Praying! Happy Thanksgiving!
Thank you, Denise! Glad you like my ornaments and I hope you and your daughter will enjoy making them as much as I did. 🙂
These are ADORABLE, Allyson!
Yay, so glad you like my ornaments, Marie! Thanks for dropping by 🙂
These turned out so, so cute and such great step by step directions!
Carrie
curlycraftymom.com
Thank you, Carrie! I was really happy with how they turned out, too. Glad you think my instructions were good as I sometimes wonder if I make sense on my tutorials LOL!
So cute Allyson!!
Thank you, Jenna! So glad you like my ornaments. 🙂
Hello Allyson!
This is a great project, wonderful tutorial and darling farmhouse ornaments.
I really like this DIY Christmas craft because it is doable! So many times we see projects that we love and that are darling, but they are just a bit too much.
I have pinned and definitely will revisit the project.
Great to share in this hop with you.
Jemma
Jemma, thank you for the compliments! Yes, definitely so quick and easy to make ~ doable. Thanks for pinning!
These are so cute! I had to pin!
Michelle, so happy you like my ornaments and thanks so much for the pin!
These are adorable, love them!
Cindy
Yay, glad you love my ornaments! I like when I can make something that is easy and cheap.
Cute and clever, Allyson. Love this idea!
So glad you like my ornaments, Ann! I enjoyed making them and like that they cost me next to nothing to make.
These are so adorable and look very easy to make. Thanks for the idea. Pinned for later!
Yes! Easy to make and cost so little to make, too. Thanks for the compliment and the pin!
These are so cute to place on a tree. You can make them to fit your theme. Your tutorial is so easy to follow. Thanks for sharing.
Thanks, Terrie! Yes, it would be so easy to change out the colors or make them all natural to fit your style.
So cute and I love how you illustrated the “how to ” of the project. Gotta love a project that you can easily change to your color scheme.
Glad you like my ornaments, Tammy. It’s good to hear my illustration steps were good as I often wonder if I even make sense sometimes!
Such cute ideas for all ages! And also a great recycling idea! Very clever and well done!
Oops, just found you in my spam. Thank you for the compliments, Patti! I always have scraps of cardboard from my Etsy packaging, so I decided to start using them. 🙂