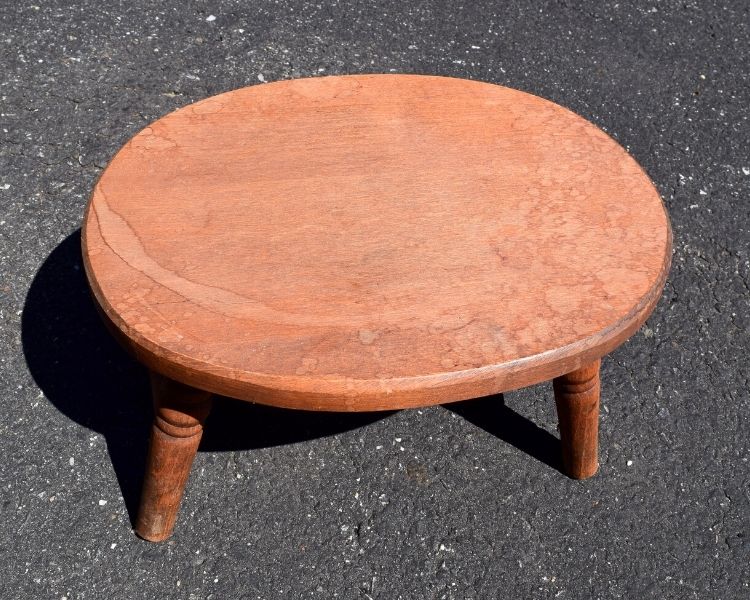
When I spotted this thrift store wood stool I envisioned that I could create a step stool makeover using stencil and stain. I had been keeping an eye out for something I could use as a plant stand.
It was a bargain for $2.00 and I couldn’t get it in my cart fast enough! For the makeover, I pictured a step stool with a boho vibe or just a well-worn look.
Follow along as I share the planning of my project, supplies needed, and the tutorial for the step stool makeover!
STEP STOOL MAKEOVER USING STENCIL AND STAIN

HOW I PLANNED MY STEP STOOL MAKEOVER
Although the wooden stool needed a good sanding, the stability and the wood were still in good shape. A creative plan was needed before I busted out the sander, though!
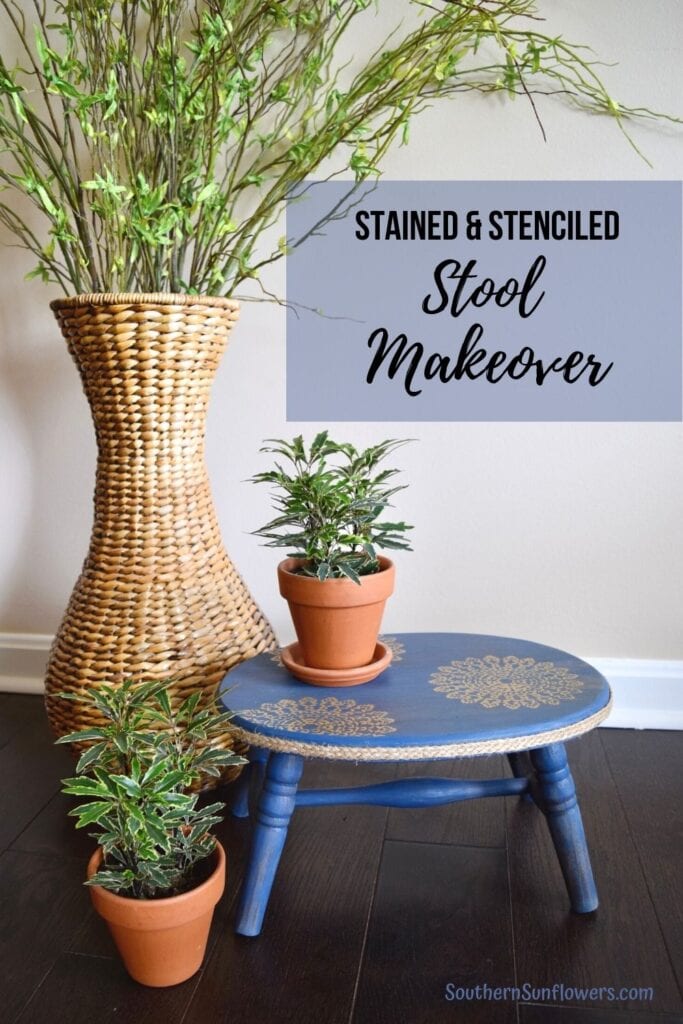
I really wanted to use blue for the main color since I’ve just started incorporating denim blue into my home decor.
From a previous trip to Lowe’s, I remembered seeing interesting colors of stain like red, green and blues.
As luck would have it, I saw a blue that I thought looked most like the denim shade I wanted. I chose Minwax Wood Finish in a Solid Color Stain.
I purchased the DecoArt “Doily” stencil and the braided burlap trim at Michael’s. Both on sale, of course!
SUPPLIES NEEDED:
- thrifted wood stool
- or Michael’s unfinished stool
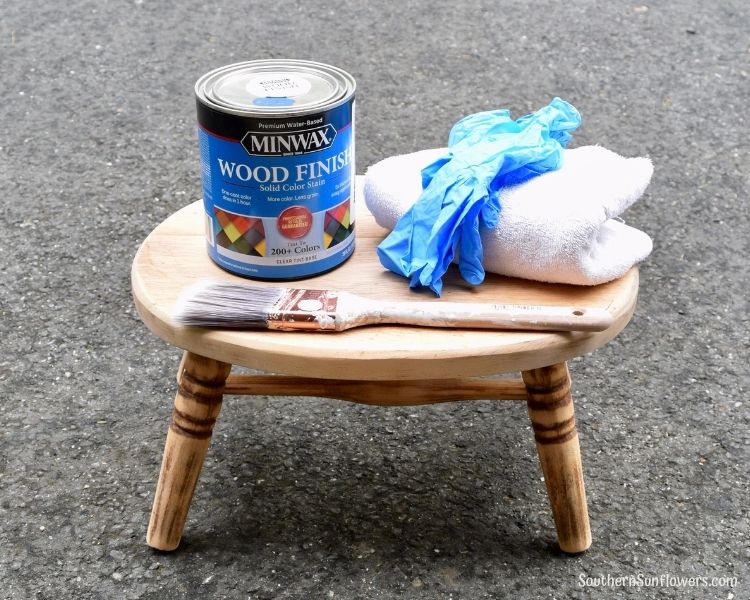
- Minwax Wood Finish – Solid Color Stain
- palm sander
- sandpaper
- synthetic bristle paint brush
- rag for wiping excess stain
- gloves
- DecoArt ‘Doily’ stencil
- craft paint
- stencil brush
- painter’s tape
- paper towel
- hot glue gun
- burlap trim
HOW TO MAKEOVER A STEP STOOL USING STENCIL AND STAIN
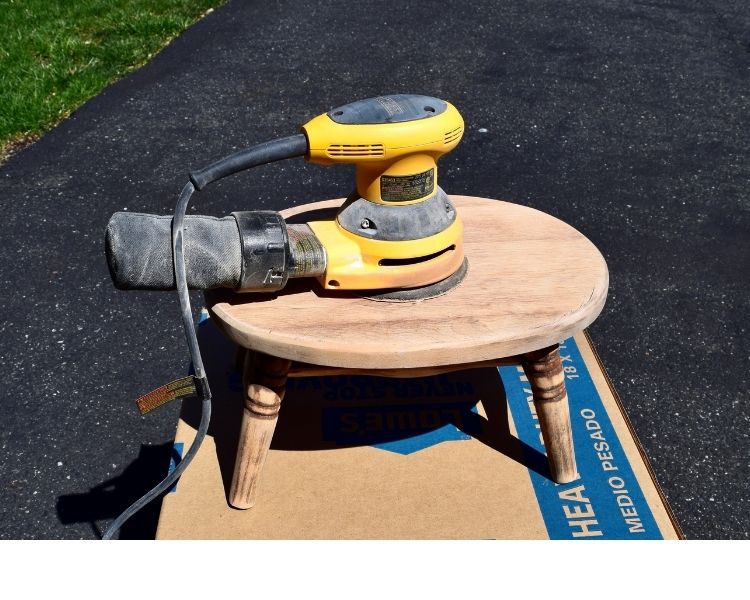
STEP 1 – SANDING THE STOOL
- Using a palm sander speeds up the sanding process, but if you don’t own one you can just use sandpaper.
- I used the palm sander as much as I could before having to use the sandpaper to get in the grooves of the legs.
- Use a cloth to wipe down the stool so no sanding dust is leftover.
STEP 2 – APPLYING THE STAIN
- Use your paint brush to apply the stain. I started on the underside first so I could get the hang of the staining process.
- Complete one section before moving on to the next area to be stained, for example, paint the underside and wipe excess stain off immediately with the rag… paint the legs and wipe off stain… paint the edges…etc.
- I stained the top last.
- Depending on how well you sanded, you may need to go back and touch-up areas for the look you are trying to achieve.
- I went back over a few areas where I wanted a deeper color here and there.
- Follow the drying time instructions on the can before you begin working on the stencil design.
STEP 3 – PAINTING THE STENCIL DESIGN
- Plan ahead and picture where you intend to place your stencil designs.
- Use painter’s tape to hold down the stencil. I use Frog Tape. I still lightly hold down the stencil with my fingers even though it’s taped when painting.
- Dip the stencil brush in craft paint and then pounce the brush end on a paper towel to remove excess paint.
- The objective is not to have the paint seep under the stencil.
- In a quick up and down motion, pounce the paint brush on the stencil to apply the paint.
- Carefully peel up tape and stencil (like a bandaid).
- Let each design area dry before moving to the next area.
TIP – I recommend practicing on something else first if you’ve never stenciled.


STEP 4 – ADDING THE TRIM
- Use a hot glue gun to attach the trim.
- I unrolled the trim as I went along glueing to the edge.
- Due to how my burlap trim was at unraveling on the end, I overlapped the ends a bit instead of butting.
Now you have the knowledge and inspiration to give a wooden step stool a makeover using stencil and stain! Do you have a stool that needs a transformation?

YOU MAY ALSO BE INTERESTED IN THESE THRIFT UPCYCLES:
HOW TO PAINT A THRIFTED GLASS FLOWER VASE
MEMO BOARD THRIFT STORE UPCYCLE
Sharing my step stool makeover at these fabulous blogs!

ABOUT THE AUTHOR
AllysonAllyson is the founder and content creator of Southern Sunflowers. She shares tutorials for DIY crafts and decor on a budget.

Love how this turned out, Allyson! Thanks for sharing at Vintage Charm! Pinned!
I’m so happy you like my step stool makeover, Cecilia. Thanks for pinning! 🙂
I love this! I have not stenciled in a long time but this makes me want to. Love the color and trim, too.
Glad you like my stool makeover, Barbara! I’m always afraid of a lot of bleed through when stenciling, but I don’t think my mistakes are too noticeable. Thanks for visiting!
What a beautiful transformation, Allyson! You have really given this stool a second lease of life and it looks gorgeous! Thank you for sharing and for being a part of the Hearth and Soul Link Party Community. I’m featuring this post at the party this week. Hope to ‘see’ you there! Take care, and have a wonderful week!
Thanks again for featuring my thrift stool makeover! It feels great to be recognized. 🙂
Love the stool makeover with stencils. That was a great thrift store find at that price.
Glad you like my stool makeover, Beverly! I love finding a thrift bargain. 🙂
C U T E ! Your thrift store find is perfect as a plant stand! I love the paint and stencil you chose! Well done! -Marci @ Stone Cottage Adventures
Thanks, Marci! Glad you like my stool makeover.
Very nice! I love how you are using it for a small plant.
Thanks, Melynda!