My Christmas tree shaped fabric pillow, which comes with a no-sew tutorial, got my creative juices flowing and was so much fun to make. It’s sure to add the wow factor to your Christmas decor!
This is a great project for those of you who don’t have a sewing machine so follow my no-sew tutorial to learn how to make a Christmas tree for yourself.
I think you’ll really enjoy having this festive pillow as a new addition to your holiday decor!
Keep in mind, not only can you replicate my design, but you can also choose traditional Christmas fabric or use any color scheme like all bright colors or all neutral shades.
There are so many options for putting your own spin on Christmas crafts like this one.
CHRISTMAS TREE SHAPED FABRIC PILLOW NO-SEW TUTORIAL

As an Amazon associate, I earn from qualifying purchases at no additional cost to you.
SUPPLIES NEEDED:
- denim fabric
- painter’s drop cloth
- thrift store jeans
- variety of fat quarters
- full size scissors – Fiskars are my fave
- small detail scissors – Fiskars
- glue gun – woth detail tip my fave
- hot glue sticks
- marker or pen
- Poly-fil stuffing
- variety of buttons
- printer and paper
- optional – needle and thread
DIY CHRISTMAS TREE SHAPED PILLOW TUTORIAL
STEP 1: CHOOSE A TREE PATTERN
You can do a Google search for “free Christmas tree templates” and view all the images or you can find one like I did at suncatcherstudio.com.
I ended up enlarging my tree outline to a poster size, following their instructions, since I really didn’t know how large I wanted to make my pillow.
Download the tree outline and print out all 9 sheets. Tape the papers together to form the tree template.
CHRISTMAS TREE SHAPE PATTERN TO PRINT
Before I taped my tree together, I played around with the sheets and chose to decrease the pattern a bit and then taped together after I was happy with the size.
Cut around the tree template.

STEP 2: TRACE AROUND THE PAPER PATTERN
Place the Christmas tree pillow pattern on the darker denim fabric and trace with a marker.
Repeat the same for the drop cloth. I usually trace on the back side when making patterns.
Cut both pillow panels out and place to the side for later instructions.

STEP 3: SELECT DIFFERENT FABRICS TO MAKE THE ORNAMENTS
For the pillow panels, I chose a medium shade of denim fabric (a store remnant) and I sneaked some drop cloth from our painting supplies.
The patchwork circles were made using fabric from thrift store denim jeans, used painter’s drop cloth, and old fat quarters from my stash.

View Fabric Options for the Christmas Tree
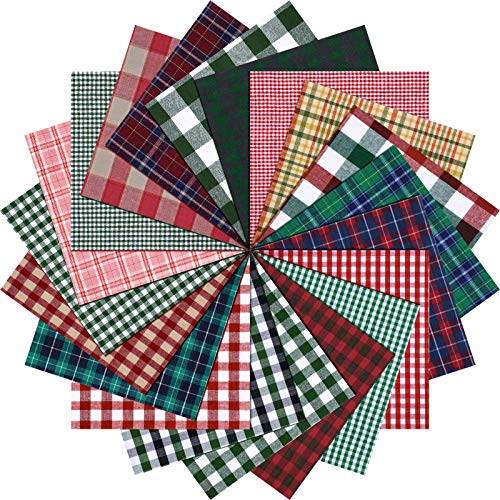
Christmas 6-inch Homespun Fabric Squares
Buy Now →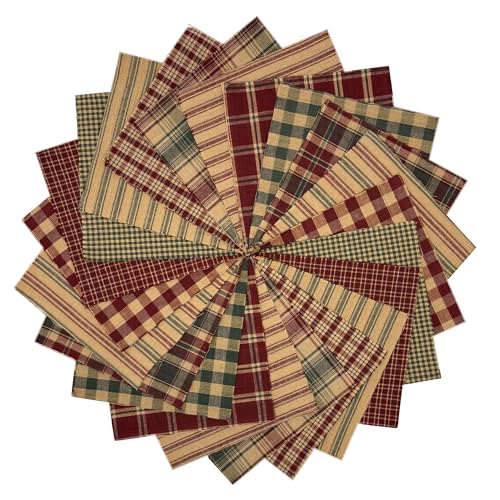
Rustic Christmas 6-inch Homespun Fabric Squares
Buy Now →ALTERNATIVE FABRIC SOURCES:
- If you plan to make a large sized tree like I did, JoAnn’s is a good place to find a large piece of denim for the front side of the Christmas pillow.
- You can also find fat quarters there to select from for the patterned fabrics needed.
- No drop cloth? Look for a cream fabric that has a little weight to it at JoAnn’s. A heavier weight makes the pillow feel more sturdy.
STEP 4: MAKE THE CIRCLE PATTERNS
Trace around a household object to make the circle patterns on your fabrics.
I used a small chalk paint bottle. The size was approximately 2 to 2.5 inches in diameter.

Begin tracing circles for all fabrics. You’ll need more denim and drop cloth circles than the fat quarter fabrics. All circles will start out the same size.
Now is a good time to watch TV while you cut out all those circles!
HOW TO CUT THE FABRIC CIRCLES:
- All circles start out the same size and will be cut along the marker circles
- Decide the fabric stack order as seen in photo above
- Consider the top circle as #1 and the bottom circle as #4
- Cut circle #3 about 1/4 inch less than the bottom circle #4
- Cut circle #2 about 1/4 inch less than #3 and continue like so until all circles are cut out
TIP: Cut 1/4 inch straight into the circle, as seen in photo below, so you don’t loose your 1/4 inch when cutting since there will be no markings.

STEP 5: CHOOSE THE FABRIC MIX AND STACK THE CIRCLES
Play around with mixing the patterns and the order of the stacks for how you want them to look as Christmas ornaments.

I tried to vary using the denim fabric versus the drop cloth as the bottom layer.
Also, I varied the order of the patterned fabrics from one ornament to the next as much as possible.

SWITCH TO GLUEING AND STUFFING THE PILLOW
STEP 6: GLUE THE TREE EDGES
Place the tree pillow panels together. Match edges up and smooth out any wrinkles.
Hot glue together the entire first tier of the tree and half of the second tier.
Run a small bead of glue on the back piece leaving a 1/4 inch or more unattached (kind of like a seam allowance so to speak) near the edge of the pillow panels and press down.

You’ll be using Poly-fill stuffing as your pillow insert.
Begin pulling apart the Poly-fil kind of like your shredding it with your fingers. This will prevent a lumpy pillow.

Supply Options Needed for the Christmas Tree

Fairfield Original Poly-Fil Pillow Filler
Buy Now →
Canvas Drop Cloth Recycled Cotton
Buy Now →Stuff one section of the pillow at a time while making sure to get enough stuffing into the tree curves.
Use any household tool like a chop stick or an unsharpened pencil to help stuff the pillow. You’ll mostly be using your fingers.
- Once the first tier is completely glued, hot glue together the rest of the 2nd tier and a little past the sharp corners and then add stuffing.
- Now, run a bead of hot glue down the rest of tier 3 of the tree, stopping at the curves at the bottom and then add more stuffing.
- Run a bead of glue in the curves on each side, leaving about a 4 inch gap open in the middle and then add more stuffing.
- Complete stuffing as much as possible and glue the gap together.
TIP: It’s easier to glue the bottom of the tree together and keep the edges aligned if you turn it backwards and glue from the back side.

SWITCH BACK TO MAKING THE CHRISTMAS ORNAMENTS
STEP 7: JOIN THE FABRIC STACKS TOGETHER
NO-SEW VERSION: Hot glue each fabric layer together and top it off with the button.
OPTIONAL NEEDLE AND THREAD: Hold the entire stack along with the button and hand sew the stack together.
STEP 8: ATTACH THE ORNAMENTS
Determine your final placement and add about a quarter size bead of hot glue to the center, which will leave some of the ornament loose and unglued.
That completes the Christmas tree fabric shaped no-sew tutorial.
I hope you enjoy creating your DIY Christmas tree shaped pillow for the holiday season.
RELATED UPCYCLED PROJECTS THAT MAY INTEREST YOU:
NO-SEW DROP CLOTH BUNNY PILLOW
DIY THRIFT STORE WOODEN HEART MAKEOVER
HOW TO MAKE A UPCYCLED WOOD ORNAMENT STAND AND RUSTIC ORNAMENTS


It’s time for the monthly “Sustainable Craft Challenge” which is a blogging group of creators who share their upcycled/recycled crafts and decor with our readers. All or parts of our projects are recycled. This month our theme is “Christmas.” You can visit all the blogger’s projects below. Don’t miss out!
BELOW, SEE 10 MORE CHRISTMAS CRAFTS FROM OUR CREATIVE BLOGGERS!

Julie @ Sum of their Stories ~ ~ Felt Star and Bead Garland
Our Good Life ~~ DIY Rosemary Wreath
Purple Hues and Me ~~ Nature Inspired DIY Christmas Wreath
Simple Nature Decor ~~ Jeweled Oyster Shell Ornament
Crazy Little Love Birds ~~ DIY Winter Tree Scenery using Cardboard
Sew Crafty Crochet ~~ Upcycled Christmas Baubles
Christine’s Crafts ~~ Christmas Tree Diamond Decorations
Decor Craft Design ~~ DIY Christmas Snowman from Old Socks
Mimi a Great Name for Grandma ~~ Christmas Tree String Art
Stone Cottage Adventures ~~ Framing a Quilted Pig

Sharing my Christmas tree shaped fabric pillow at these fabulous blogs!

ABOUT THE AUTHOR
AllysonAllyson is the founder and content creator of Southern Sunflowers. She shares tutorials for DIY crafts and decor on a budget.
This is so cute Allyson. Great instructions and my favorite are the layered ornaments. Thanks for the inspiration. XO- MaryJo
Thank you, MaryJo! Glad you got some inspiration from my pillow.
LOVE that this is a no sew project Allyson!
Will be featuring you starting Wednesday at the Creative Crafts Linky Party! Pinned and shared!
Creatively, Beth
Yes, anything that doesn’t requiring sewing is the best lol. Thank you so much Beth for featuring my Christmas pillow!
I am saving scraps now. I’ve been wanting to make. Tree pillow for a while, and I’m saving your template, thank you fornsharing Allyson! I think holiday decorating always makes our homes feel so much more cozy and warm. I can envision an entire bench full of these pillows!
Your pillow is adorable, Allyson! So clever, and so cute! So glad you shared at Tuesday Turn About! Your pillow will be featured at the party this week! Pinned!
I’m so glad you like my Christmas tree pillow, Julie. Thank you very much for the feature at your party!
I’m featuring you this week when the next To Grandma’s house we go link party starts! Thanks for sharing with us and happy turkey day!
Tarah, thanks so much for featuring my Christmas tree pillow. I appreciate it!
This is an adorable project. I love that used denim.
Thank you for the compliment, Cindy! Thanks for dropping by. 🙂
I am truly obsessed with the Christmas Tree shaped fabric pillow. First of all….denim is my ultimate choice for fabric. Your pillow is unique and so fun! I also love how you layered the round pieces and secured them with a button for the ornaments! Super cute!
Michelle, I’m a huge denim fan, too. I’m so glad you like my Christmas pillow! 🙂
Ok, I would pay big money for this at a craft show. Totally adorable.
Awesome, Terri, thanks for that big compliment. That makes me feel great that my pillow looks sellable!
Thank you, Terri, for that big compliment. That makes me feel great that my pillow looks sellable!
I love a good denim craft, and this is a great one! I love the ornaments! Too cute! Pinning!
T’onna, I’m glad you like the ornaments I made for the Christmas tree. Thank you for pinning!
Such a beautiful tree. I love the fabric you choose. Just a stunning result.
Thanks for the compliments, Maria! I was happy with how the pillow turned out.
Allyson, your Christmas tree-shaped fabric pillow turned out lovely and I love that it is a no-sew. Wonderful tutorial.
Stephanie@Crazy Little Love Birds
Thank you, Stephanie. I’m glad you like my Christmas tree pillow! 🙂
This is so cute! I love having seasonal pillows. Thank you for the tutorial! -Marci @ Stone Cottage Adventures
Thanks, Marci. I’m going to keep my pillow out for winter too since it doesn’t scream Christmas. Stretch it through another season!
This is so cool! I love how you glued everything for all those who don’t want to sew. It looks fabulous! Great detailed instructions too!
Thanks, Christine! Glueing the pillow together is easy enough that anyone can make it. I’m glad you think the instructions were good as sometimes I think crafters might think all those details are overkill ~ lol.
You had me at “no-sew,” Allyson! What a fun way to make a tree pillow with ornaments! Thanks for the inspiration! My head is spinning with ideas on making one! Can’t wait to try!
Gail, even though I’m a sewer, I thought the no-sew version was the way to go so more crafters could make the pillow. I would sew the tree together if I planned to sell some. Glad I could give you some inspiration!
I really love this rustic vibe with the denim, drop cloth and the fabrics you’ve used. I have a couple of old cushions/pillows that I saved so I could reuse the stuffing, they would be ideal for this kind of project.
I feel like there might be a lot of “tv watching whilst cutting out” going on soon, I mentioned just yesterday on my instagram that there are few things nicer than watching something light and fluffy on tv whilst doing a bit of cutting out prep for a craft project!
Julie, that’s a great idea to re-use pillow stuffing. I hadn’t thought of that. Yes, to lots of tv watching ~ I can’t sit without doing anything.